
I had no business being in Cincinnati on the night of May 29th, 2020. The world is coping with a global, deadly pandemic; anger is rising in waves as a response to George Floyd’s murder; life looks nothing like it did four months ago. That didn’t stop me, my mom, sister, and her friend from traveling to Cincinnati for a “girls weekend” as a post-graduation trip for my sister. We were supposed to go to Mexico – Cincinnati seemed like a reasonable alternative in COVID times.
Read MoreMcCall's Early Fall 2016 Patterns
McCall's has just released their early Fall 2016 patterns and I think they have several winners. Most of the are pretty basic and look like many other patterns I've seen, but these are a few that jumped out at me...
7433
 Just gorgeous vintage style. I'm in love with the fabric choices here and all the little details. From their website:Pullover dress has semi-fitted bodice, side zipper closing, skirt with front and back pleats, self-belt and contrast neckbands. A: Short sleeves with contrast band. B: Long sleeves with cuff and placket.Circa 1943I love the delicate pleats of the skirt, the gathering at the yoke and the pretty collar. It even has little notches taken out that are hard to see in these fabrics. While I'm absolutely in love with this dress I don't think it would be super practical. Although, I guess if you lose the gloves and vintage styling it automatically looks a little more contemporary.
 7431
 McCall's is jumping on the boho 70s trend! I am totally ok with that as I've purchased 3 (!) wide legged flare jeans in the last few weeks. Don't worry, they're all in different washes so they look totally different! I swear ;)Again, they chose a great print and fabric for this dress. It actually looks like it may be from the same fabric line as the previous dress. Amazing how it suits both time periods so well, even though they're such different looks. From their website:Pullover dresses have elastic seamed waist, sleeve and length variations. A: Front bodice lace-up with two-part eyelets and trumpet sleeves. B: Purchased lace and bishop sleeves. C:Purchased piping and flared sleeves with ruffled band. D: Sleeveless and floor-length. C, D: Notch neckline.I really like the way the yoke has a piping option as well as a lace-up option. I'm not really a lace-up kinda girl but it looks great on the model. There are several sleeve options, as well. The bishop sleeves are probably most to my taste. Another thing I like about this dress is that it has a gathered waist. I see a lot of boho shift dresses with no waist definition. While that looks nice on less curvy women, I really need all the waist definition I can get. This dress pattern could easily be changed into a shirt pattern and that's awesome, too.
 7429
 I'm a little less enthused by this pattern. I like the nice draping effect in the front, but the high neckline looks weird to me (especially the mock turtleneck version, wtf). I'm also worried that the draping would potentially draw all focus to the tummy area in a bad way. It could be really pretty, though, on the right person. From their website:Close-fitting pullover dress has front twist detail at waist and neckline variations. A, C: Sleeveless. A, D: Mock-neck collar. B:Long sleeves. D: Short sleeves. Note: No provisions provided for above waist adjustment.
 7436
 Not a bad shirt pattern. I actually like the pussy bow version of this one better, but the photo has these weird black lace inserts that are just ugh. Definitely has potential, though, and a good pattern to show off a pretty fabric. Is it just me, or are there some fitting issues going on here?Loose-fitting tops have long sleeves, collar variations, front pleats, and narrow hem. A, D, C: Collar extending into tie ends. B: Back neck hook & eye closure and stand-up collar. C, D: Bishop sleeves with button cuffs. A: Flared sleeves. B: Cuffed sleeves.
 7446
 YES. This whole outfit is one big yes. That galaxy print fabric is so amazing. I feel like the sewing world needs more galaxy print and also athletic wear. There are definitely some good pattern options out there, but a girl always needs more! Actually, I've never even sewn an athletic wear garment, BUT THIS MIGHT BE THE PATTERN TO START WITH.Maybe. If I can face my fear of sewing lycra. Anyway, love the seam lines, love the color-blocking options. I have to say, though, not a fan of the jacket. Maybe it's the fabric, but it looks a little too...Zenon, Girl of the 21st Century to me.For reference:
 Anywho, this is the info on their website:Loose-fitting jacket has stand-up collar, separating zipper and shaped hemline. Wrong side of fabric will show. Close-fitting tops and tunic have side seam panels, shaped upper front, elasticized neck and armholes, racerback straps, narrow hems. Close-fitting leggings have shaped front and back contrast. F: Pocket at hip. All have stitched hems. There are plenty more Fall 2016 patterns, but none of them were really doin' it for me. Definitely check them out, though!
Copycat Dress in Rayon Challis
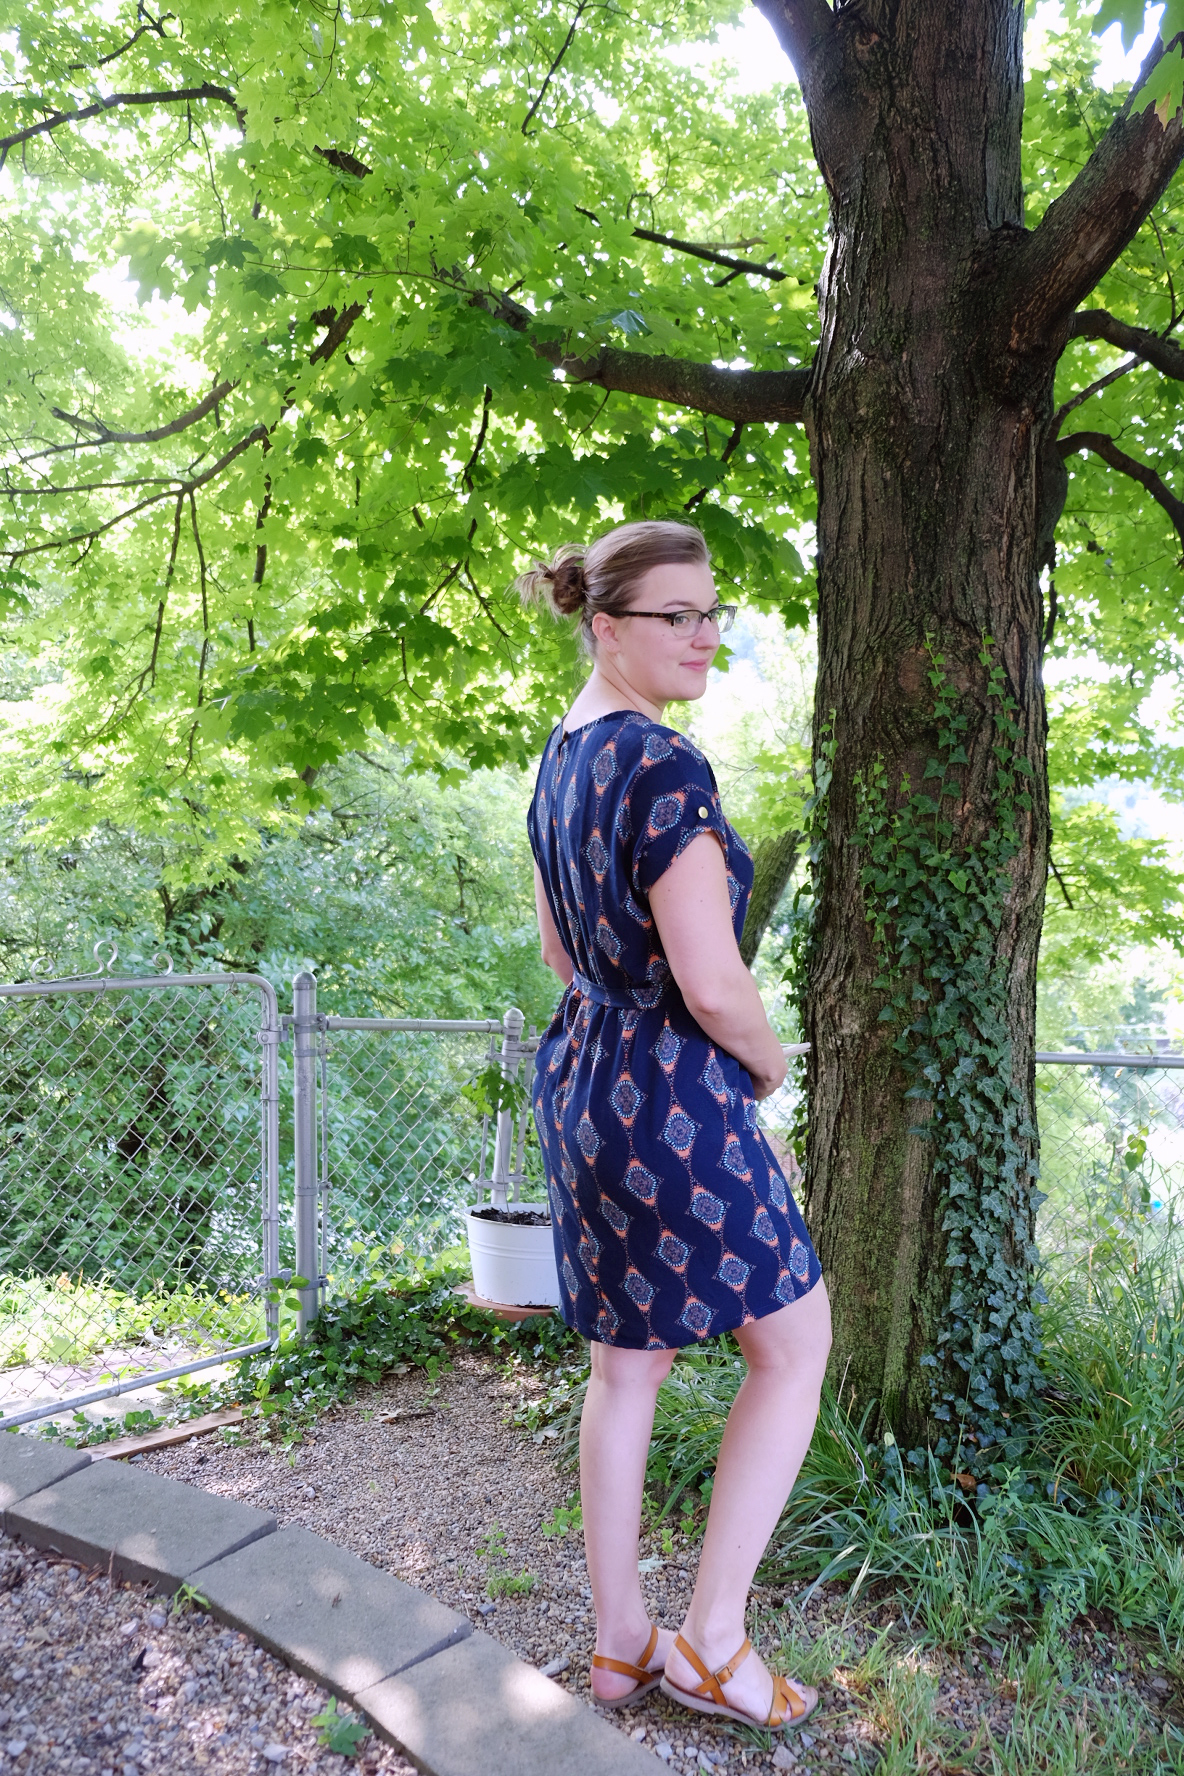
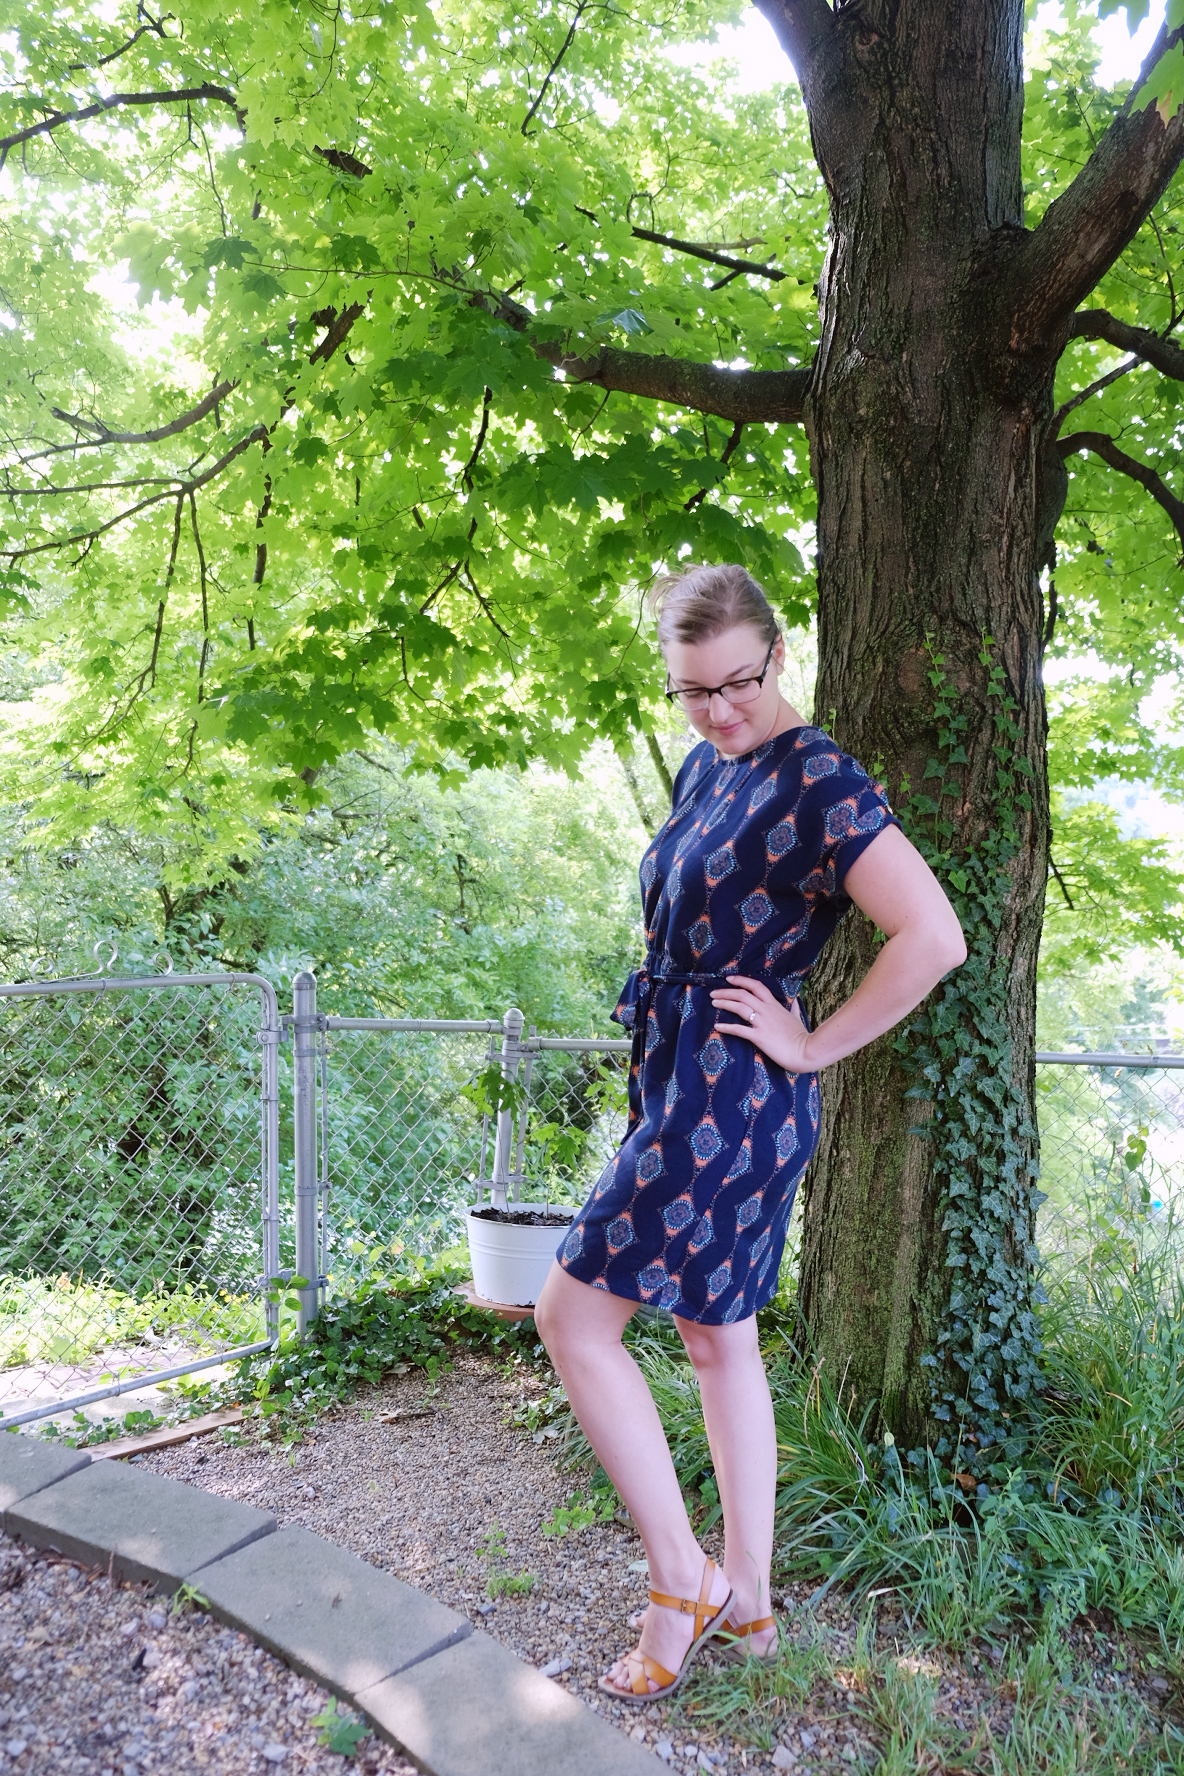
This dress was made from a "rub-off" of an Old Navy dress. The dress I used for the pattern has grown-on sleeves, a high neckline, a keyhole back and a cocoon shape. The fabric is a rayon challis from LA Finch Fabrics. It has a gorgeous drape and hand, but unfortunately it snags and runs very easily.To make the pattern I traced around the seams with the dress folded in half lengthwise using translucent paper and a sharp tracing wheel. I then added a seam allowance as needed and made measurements to cut out a faux cuff piece.The construction was quite simple and I serged all the inside seams. Just sewed the shoulder seams, the side seams, the CB seam (until I wanted to stop for the keyhole), top-stitched the keyhole, made the cuffs and hemmed it. I used single-fold bias binding to finish the neckline. As you can see, I applied elastic to keep the dress fitted around the waist. I generally don't find cocoon shaped dresses too flattering, so this keeps the dress comfortable but still shapely. I also made a tie belt since I don't like the look of an elasticated waist by itself. The elastic seemed too high once I started wearing the dress, so I ended up unpicking it at the front and restitching it lower by about 2 inches in the center front.
 While grown-on sleeves can be awkward and sort of wing-like on me, these actually fit pretty well. I also like the faux cuff but it did take some coaxing with the iron to get them to lay flat. There's a tiny little rouleau loop to hold the gold button I used on the top of the keyhole. There are two matching gold buttons at the top of each cuff on the shoulder seam.
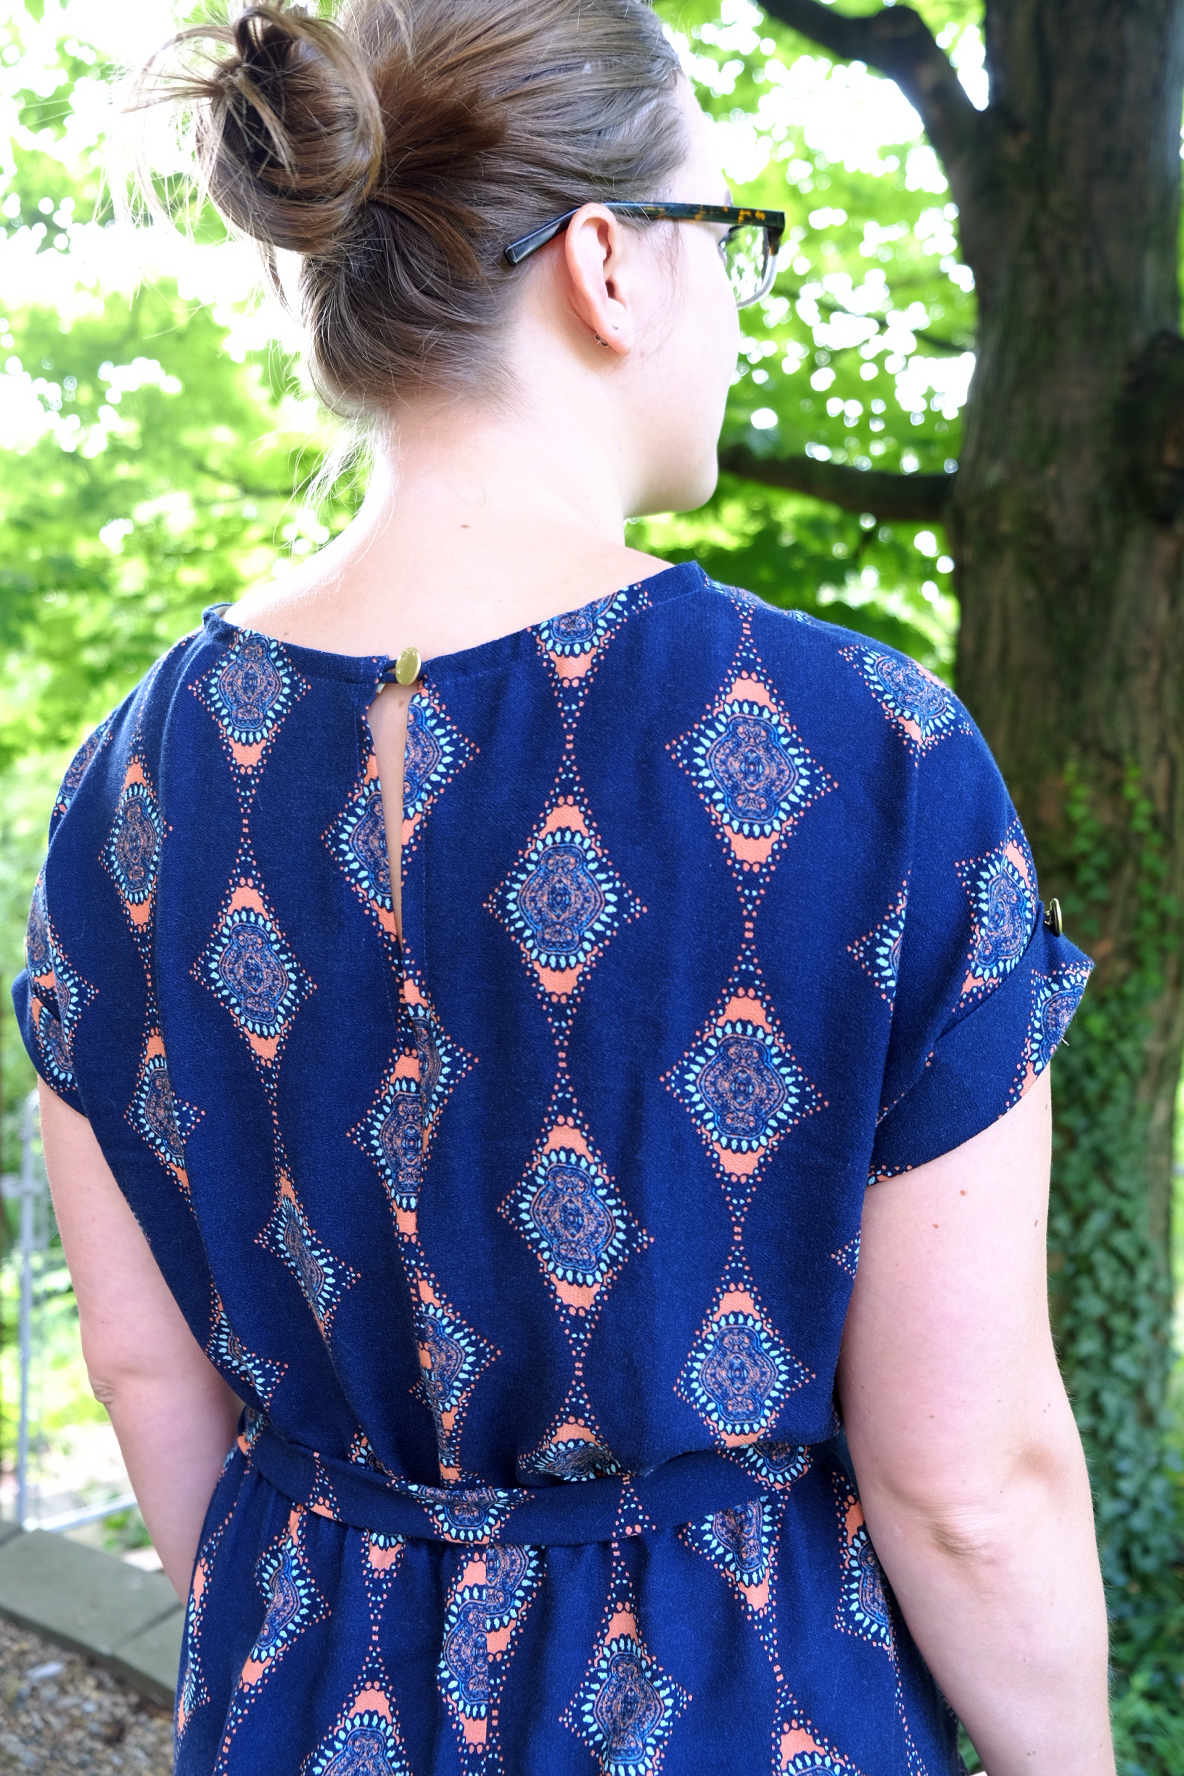
 After wearing this dress for a little bit I have a few adjustments to make to the next one:
- Make the neckline more of a scoop. The high neck is a bit restrictive.
- Add a little more ease to the hip and thigh areas. In a stiffer fabric it would definitely be too tight.
- Add pockets next time! Duh, why didn't I think to add them to this dress?
- Make a forward shoulder adjustment. The neckline in the front keeps choking me and the back is pulling down, so I think the forward shoulder adjustment should help that. Or maybe I have -- say it ain't so! -- a dowager's hump and need to add fabric to the upper back at the center seam.
 Overall, I'd say this is a pretty successful copy of a RTW garment and it's a totally wearable muslin. Oh -- and I totally tried to pattern match but it was a bust. Next time it'll be perfect! ...Probably not, but who's really looking for that anyway?
A Muslin Turned Never-Ending Project
In my rather large pile of UFOs (unfinished objects) I found this rather Amish-looking linen dress that was in desperate need of a face-lift.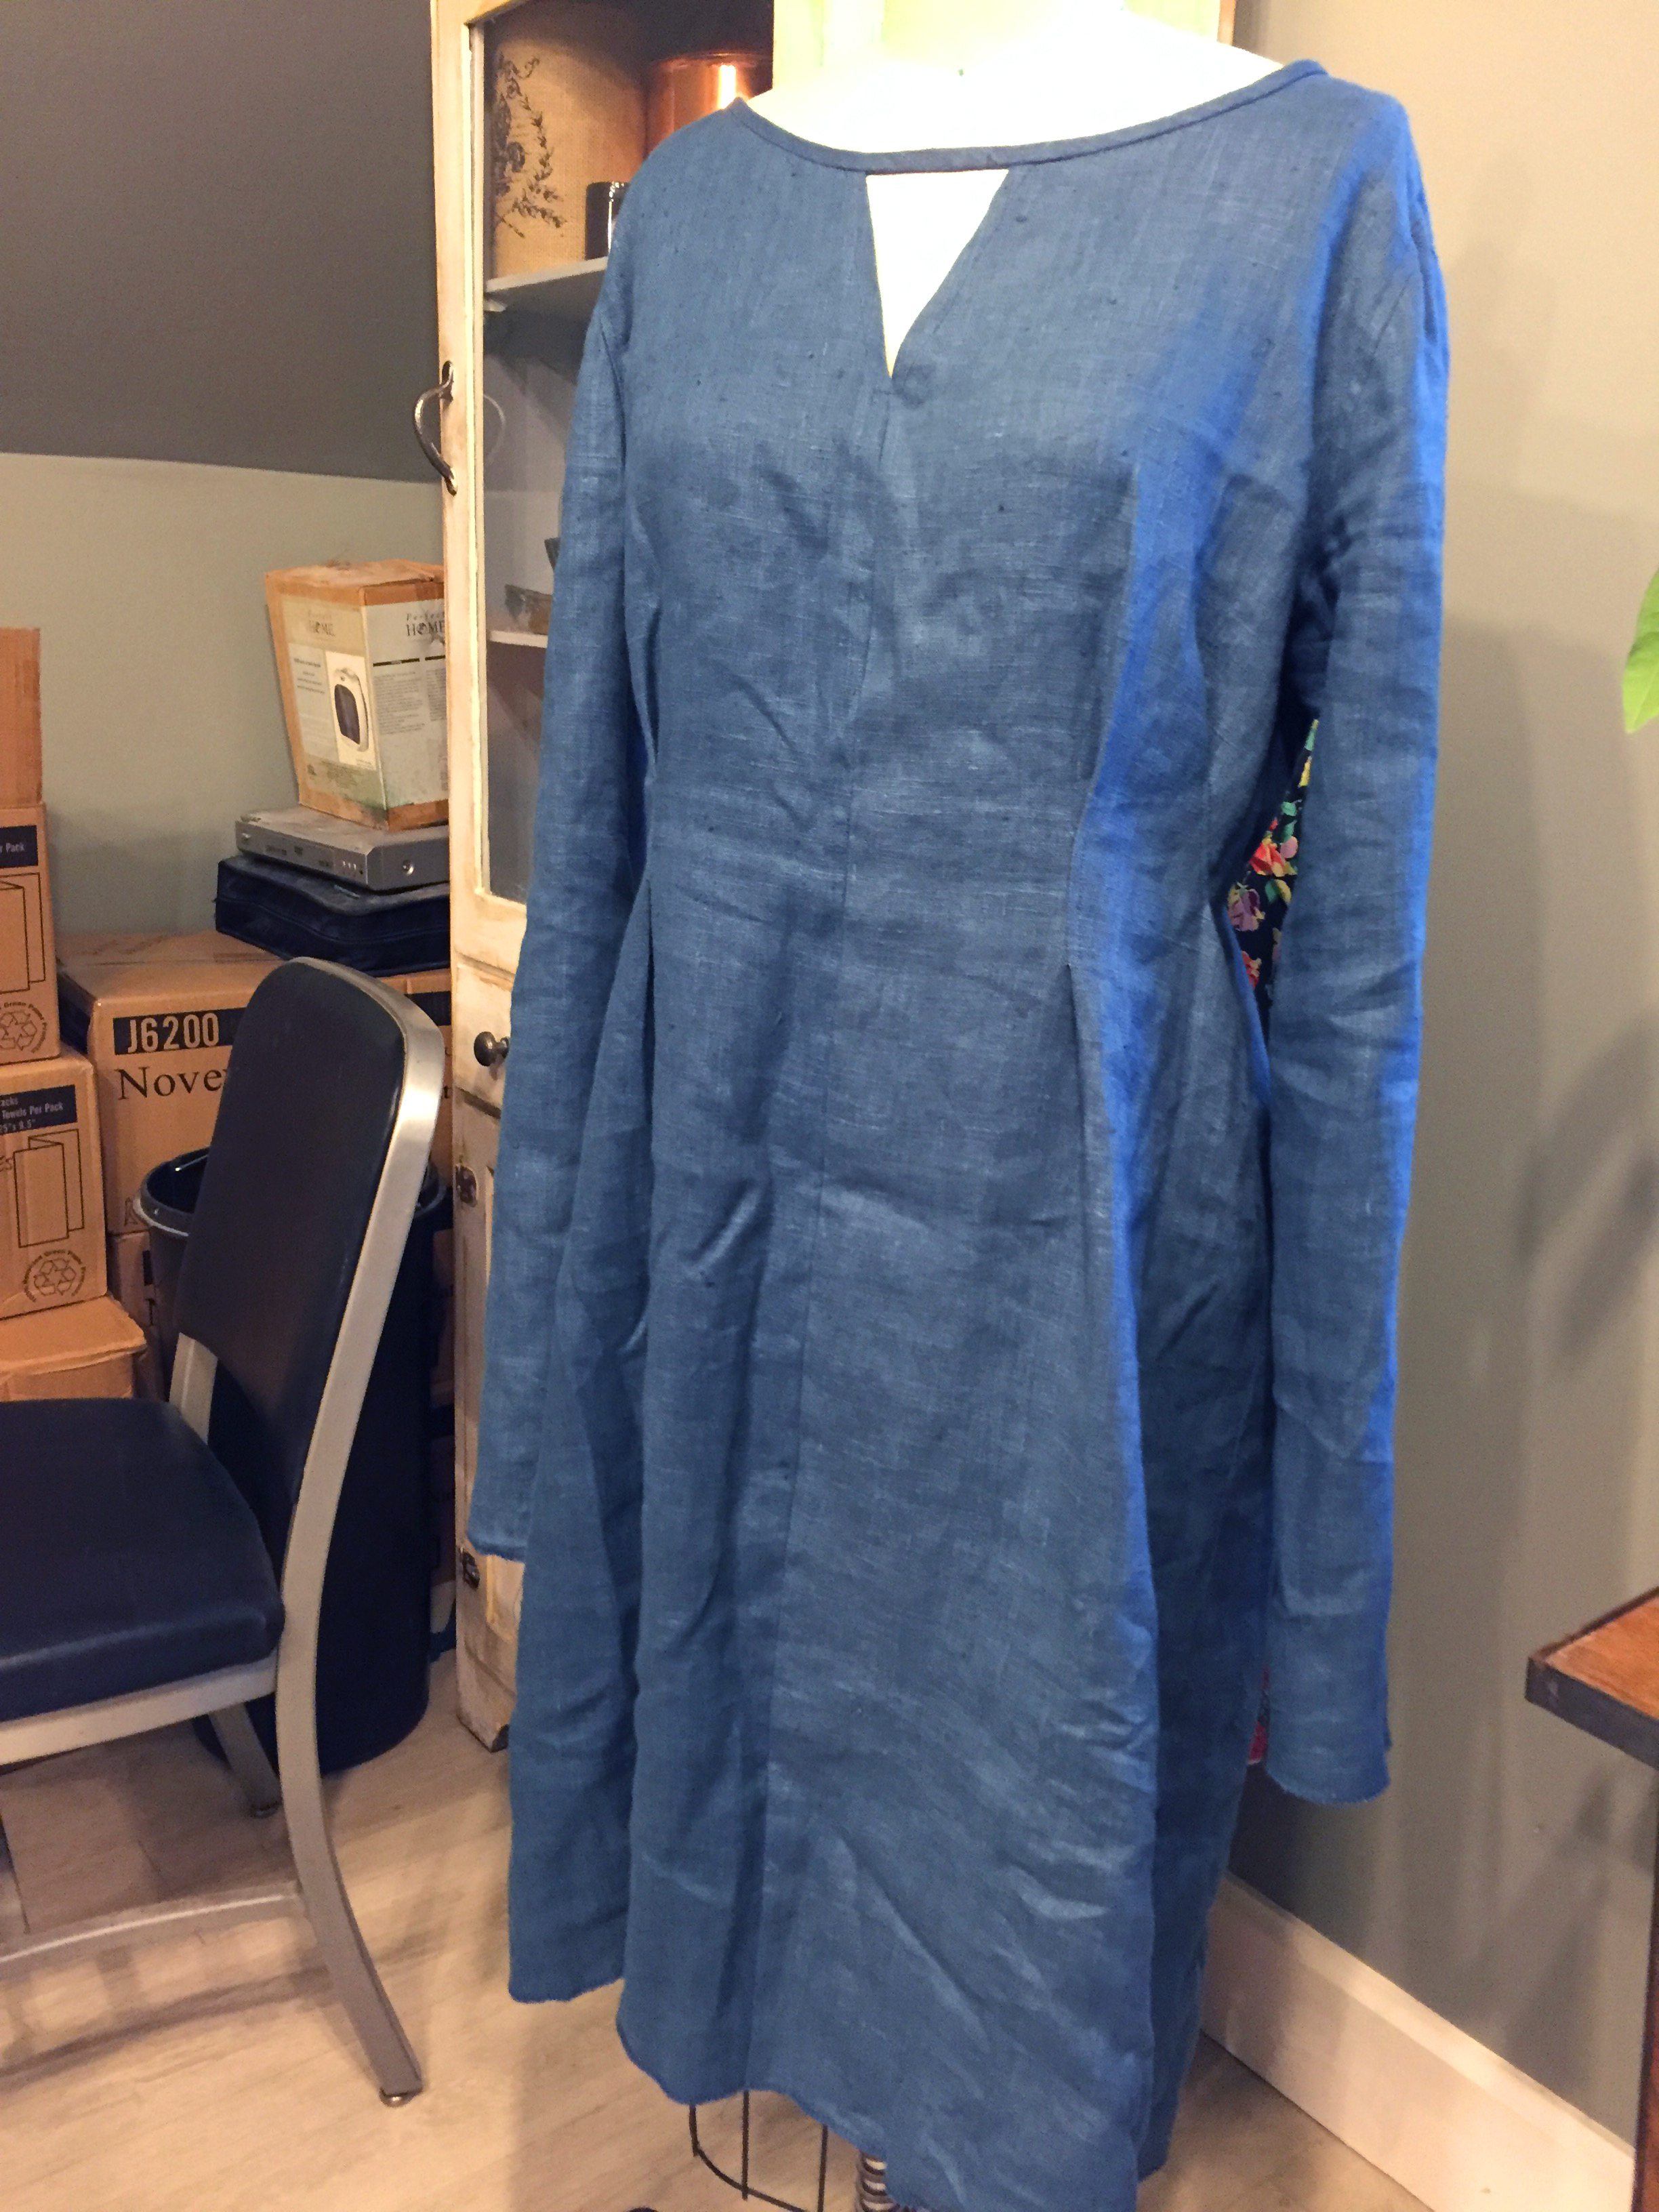 It was intended to be practice for a loose shift dress (using Simplicity 1280) with long bell sleeves and a fabric belt, similar to this one. Of course, the slubby linen I chose to work with was completely wrong for that silhouette, but rather than abandoning the burlap sack I had made, I attempted to give it more structure. I added open darts to the front and back, slimmed down the sleeves and it still looked horrible.Flash forward about six months and I was ready to look at the sad, sad dress again. Figuring I had nothing left to lose on this one, I went ahead and chopped off one sleeve past the shoulder seam. It looked good! I chopped off the other sleeve and the dress already looked 10 times better. Other changes I made were to take out several of the darts I put in, add an armscye dart to take in excess fabric in the arm hole and shorten the hem by about 3 inches, curving it up toward the side seams and letting the back dip a little lower than the front. What a difference!
 I think it looks much more updated and wearable. In fact, I wore it today![surow][sucolumn size="1/2"]
 [/sucolumn][sucolumn size="1/2"]
 [/sucolumn][/surow]Although I really want to be done with this project, I'm sort of thinking it could benefit from some patch pockets and two darts in the back to take in some of the excess fabric there. I also don't love the neckline...it seems way too big, so that the bias binding on the little cutout juts forward.
 Or maybe I'll just call it done and move on! What do you think?
Me-Made May 2016 - Week 4
I'm a little sad to be ending this great challenge of wearing one handmade article of clothing each day. It's been so inspiring to see what others have made and to recap the (larger than I thought) collection of items that I've made. The experience of wearing my own clothes has helped me figure out ways to grow and become a better seamstress. It's made me realize some of my pitfalls, helped me figure out what styles and fabrics I like best, and where the gaps in my me-made wardrobe are.Also that I like to wear blue. Like, a lot. Maaaybe I should branch out more? But, then again, I know I'll wear it if it's blue...Here's a quick photo recap of the last week and a half's outfits:[BestWordpressGallery id="4" gal_title="MMMay Week 4"]I have a ton of dresses and a few solid skirt options, but my trousers and shirt options are very limited. I also don't have any me-made sweaters (except for that one in the back of my closet that's never seen the light of day because I ran out of yarn and had to get more and you can clearly see where the new yarn starts and it drives me crazy...)I guess my challenge for the next 2 months is not to buy any more fabric and to repair my makes that need some help. I've already fixed two dresses and a shirt, so it's a start!Oh, and one other awesome thing about wearing/making your own clothes is that it helps you limit RTW clothing purchases. Kind of hard to justify buying something if you could make it cheaper and better. Although, I did just buy a pair of jean shorts. They were only $10, ok?? And I've already worn them three times! And jorts are haaard. Although, I can't make my own shoes (yet) so I still can't help but buy those. I'm working on it.
L.A. Finch Fabrics Review
Someone I follow on Instagram recently posted a photo of some new fabrics that they got via a company called L.A. Finch Fabrics. I, of course, had to look into it to find out where these amazing fabrics had come from. Turns out that they have a gorgeous selection of apparel fabrics that would be difficult to find at most fabric stores. I did end up purchasing several yards of fabric to try out. Mostly rayon challis, ponte knit and one silk (my first silk purchase!).Here's a quick look at the new items: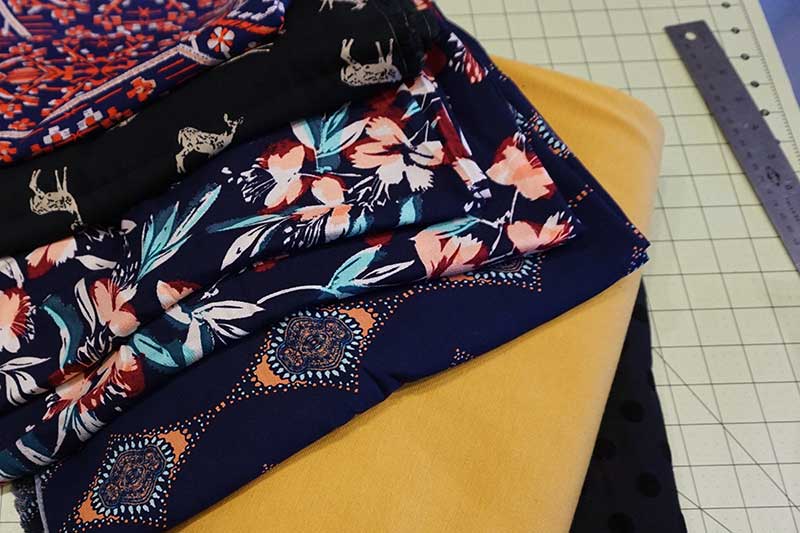 Not only did they send the fabrics, they also included a huge stack of samples, 6 tiny coconut buttons, a good-sized length of black lace ribbon and several twill tape scraps which they used to bundle the fabric. There was, unfortunately, an issue with the gorgeous floral rayon. I ordered two yards of it to make a dress and they sent me two separate yards of it. Obviously, that wouldn't work for making a dress.I emailed them and told them about the issue. The immediately gave me a refund for the floral fabric and asked if I'd like two yards of a different rayon since the floral had a dye issue. I looked through their site and nothing really stood out so I just asked for two more yards of the floral, weird dye or no.All in all I was disappointed that it happened in the first place but they handled the issue quickly and above and beyond my expectations. I will definitely continue shopping here because I'd like to support a smaller fabric company vs. JoAnn fabrics. Still, though, how does that even happen? Oh well.Here are the fabrics I bought draped on a form to show off the print/weight:
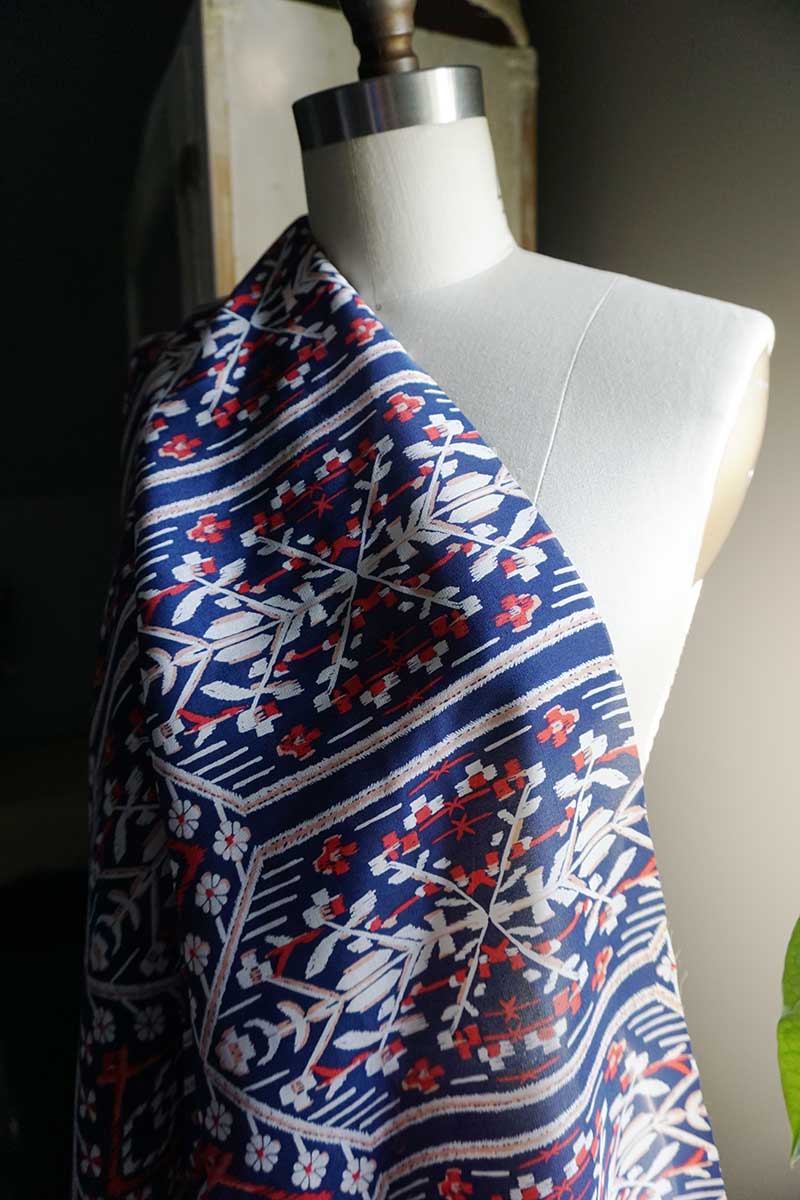 [Bohemian Vista Red Printed Silk]
 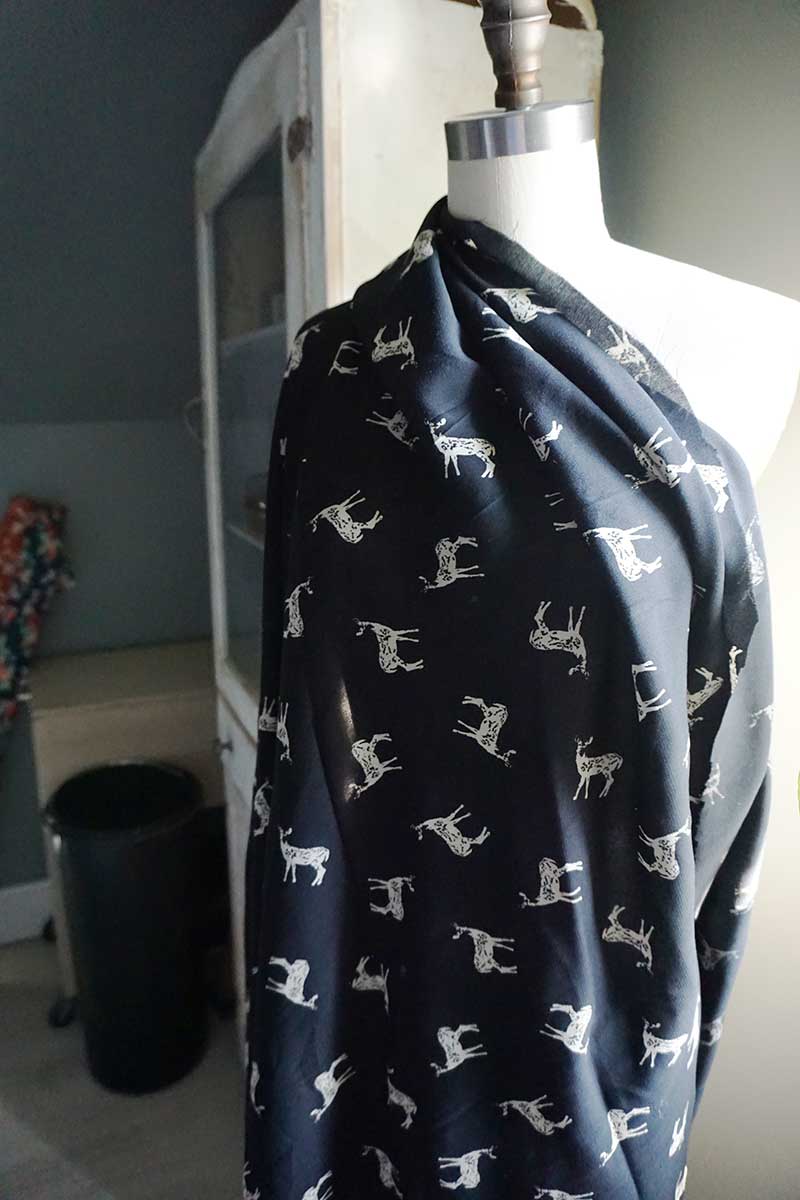 [Rayon Deer Printed Woven]
 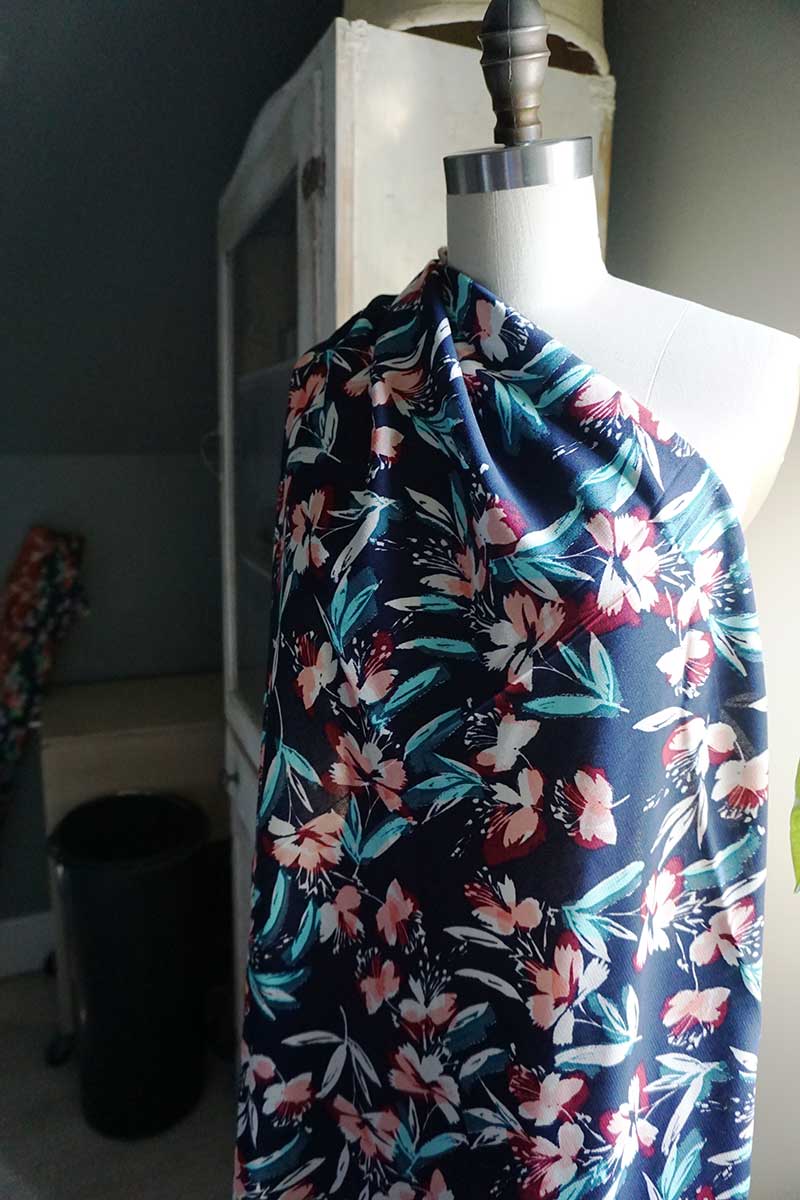 [Helena Floral Rayon]
  [Ruthie Printed Rayon Challis]
 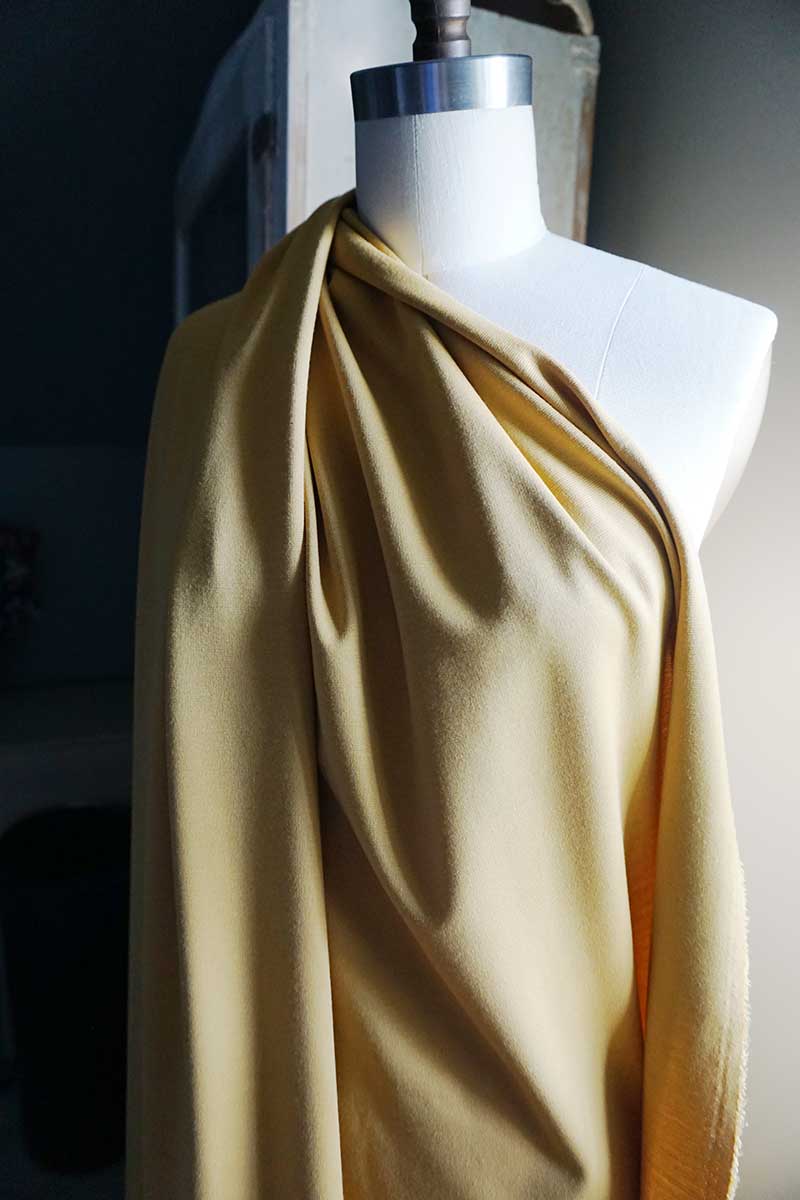 [Mustard Yellow Ponte De Roma Solid]
 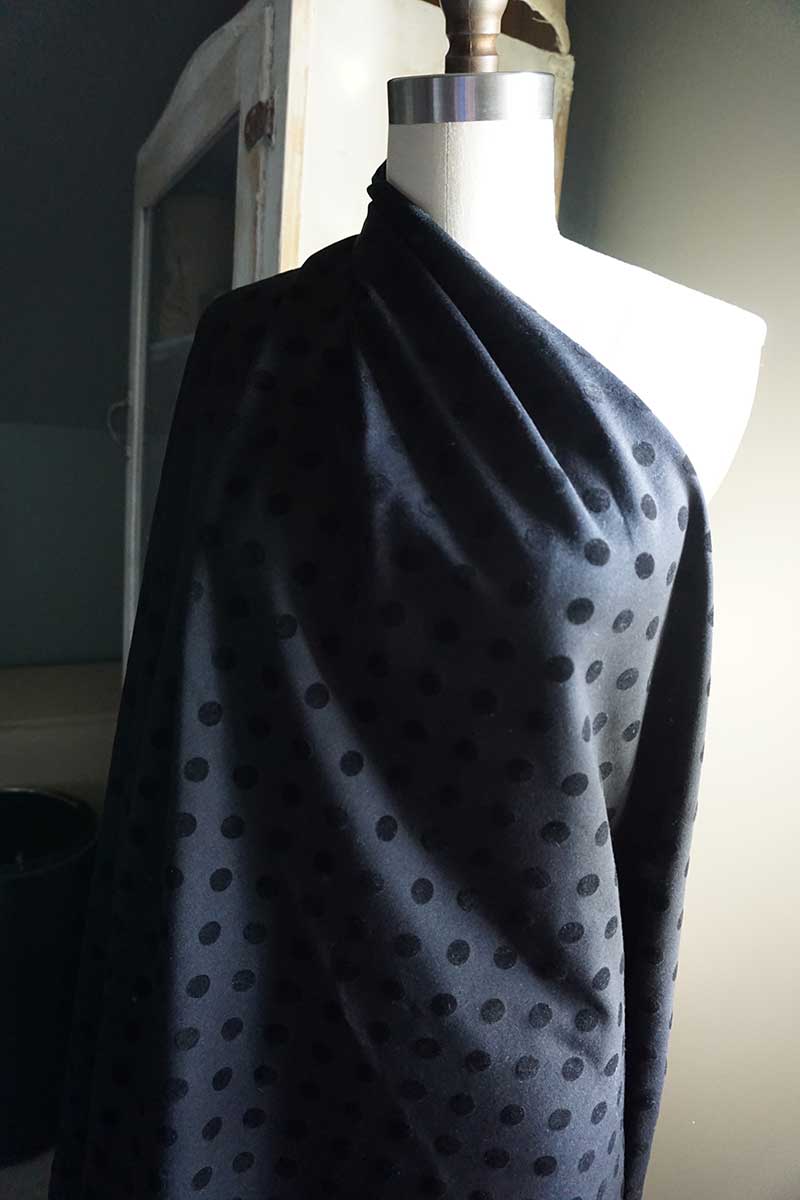 [Ponte De Roma Black Velour Dot] And here is my plan for all these luscious fabrics!
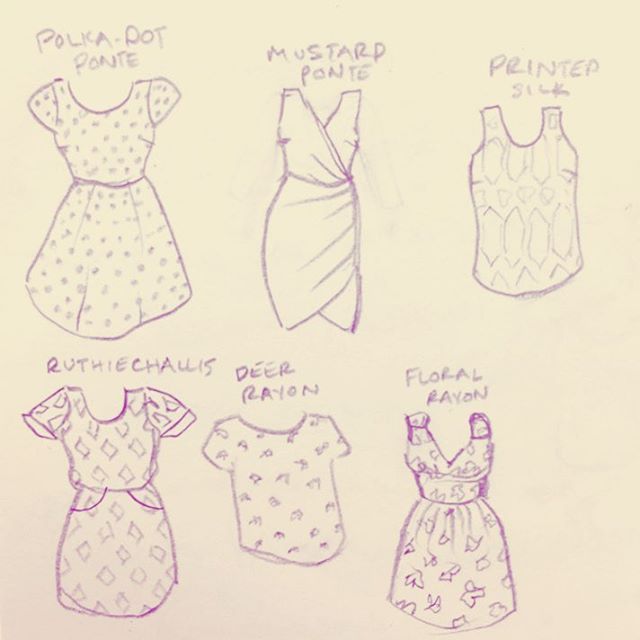
Me-Made May 2016 - Week 3
Week 3 of Me-Made May had me looking quite blue! I know there's a lot of blue, white and gray in my closet, but this week really showed me how much I reach for those colors. I'll blame it on the rainy May we've had so far, although it looks like the weather may be finally turning around!And I have a ton of blue-hued fabrics in the stash...oh well, I guess I should stick with what works! At least I know I'll wear it.Here's the past week's MMMay recap:[BestWordpressGallery id="1" gal_title="MMMay Week 3"] This past weekend I unearthed a box of UFOs...unfinished objects. An ominous phrase in sewing. I have several piece that need just a few touches before they're wearable again. Hopefully this week I can find some time to dedicate to these unloved pieces.A lovely package (the details of which will be shared later) came from L.A. Finch Fabrics. Their selection is so lovely, and from what I can tell, their fabrics are very high-quality. Can't wait to dig into my new fabrics!Unfortunately, I had to do some practical sewing this past weekend...new cushions for a super cool mid-century modern chair frame. It still had the original cushions on it and I've been saying for literally two years that I'm going to redo the cushions. Brad, in typical Brad fashion, found some foam (he still won't tell me where) and batting, so this weekend's project was to finally make new cushions. It took several hours of intense sewing (and a few choice words if I'm being honest) but we got it done! Now I can do some fun stuff. I'll share before and after photos later this week, as well as our process.
Me-Made May 2016 - Week 2
The second week of Me-Made May 2016 is over and I've managed to not repeat any of my me-made items yet. Honestly, I had no idea there were so many wearable me-made pieces in my wardrobe! Although, I suppose that's why this sewing challenge exists. To rediscover past makes, get inspiration for new projects and motivation to fix issues with pieces that aren't working for one reason or another.Here's a recap of my second week wardrobe:[BestWordpressGallery id="2" gal_title="MMMay Week 2"] I still haven't managed to complete a project other than the black knit shirt I made at the very beginning. There's a pencil skirt in the works, though. Too many things to sew and not nearly enough time to sew them!
Me-Made May 2016 - Intro
This is the first year I will be participating in Me-Made May, a challenge started 6 years ago by Zoe over at So Zo, What Do You Know? Over the past few years I have seen other bloggers joining the challenge and finally, this year, I was on top of things enough to be aware that it was coming up and plan accordingly. Yay for thinking ahead!I've challenged myself to wear one "me-made" item a day throughout the month of May. To keep myself accountable, I will take daily photos (if you follow me on Instagram, be warned - lots of selfies are coming) and I will post my progress weekly on this blog.It's only day 9 and I've already been so inspired by what everyone else is showing off! My sewing mind is on overdrive and I can't wait till I get the chance to sit down at my machine again.To avoid becoming overwhelmed by all the projects I have in mind, I've decided to make a plan. I want to try to create a new piece each week and here's my plan: I made a prototype of the woven tee although I've been lurking HARD on Grainline's Scout Tee but just can't justify the cost of a pattern for what should be so simple to draft. My initial shot at the self-drafted tee has some issues that need to be worked out (sleeve cap too high, neckline too big, overall front width too big...) but it might be salvageable. You can see it in the first photo below:[BestWordpressGallery id="3" gal_title="MMMay16 Week 1"]After my first full week of wearing one me-made item a day I can pick up on a few trends:
- I am drawn to floral printed fabrics. This is a little surprising to me as most of my RTW wardrobe is very basic and limited to stripes or polka dots in terms of pattern. I guess sewing is where I make more feminine pattern choices!
- The majority of the pieces I've worn so far are self-drafted. Maybe this is because I'm not comfortable sewing patterns yet? Or maybe because these tend to fit better? Not sure...
- Speaking of fitting better, almost every piece I've worn has some sort of fitting issue I notice. The main issues are low armholes and forward-thrusting, sloping shoulders (I think). This was especially apparent on the yellow blouse.
- Make any fitting adjustments to the garment before I wear it. I could have easily adjusted the sleeve width on the kimono top, but instead I let it drive me crazy all day.
- Don't worry about not completing some of the other parts of my pledge (finishing a garment every week, posting a photo every day) because sometimes it's just not feasible.
- Always use a nice camera for the photos! The iPhone ones are so crappy looking but my fancy camera wasn't cooperating for a couple of the days.
- Plan an extra 10 minutes to take a photo before heading to work. My mornings have been a little frantic and that doesn't translate to a good vibe for the day.
My Winter 2016 Capsule Wardrobe
Turns out I'm a little late to the game on the whole "Capsule Wardrobe" thing, but I figure a great idea like this is something you can pick up any time. I stumbled across the blog un-fancy.com and was totally inspired by the author's style, chic looks and realistic way to pare down her wardrobe.I definitely struggle with over-shopping. It's not so much that I buy a ton of expensive stuff, more so that I tend to buy random crap just because it's "only on sale for one day" or "kind of my size" or "ridiculously discounted in the Target clearance section" (my weakness).In fact, here's a confession: I recently purchased a pleather mini skirt at The Gap outlet because it was only $4.00. I mean, come on. You can't beat that! And while I love the idea of a pleather mini, the only one they had was a size too big. "I'll take it!" I thought as I threw onto a growing bundle in my arms. "I'll just trim down the sides."I still have plans to try to slim down that skirt but it really made me realize that I was just buying things because they were inexpensive. Not because they were high-quality or something I'd wear often. Reading Un-Fancy helped kick-start another closet cleaning.I've purged my closet a few times in the last year. This time I found several pairs of pants that I hadn't worn in at least 4 years, a bunch of ratty t-shirts and a few nice dresses and sweaters that I had never worn simply because they didn't fit right. Of course, all found in the clearance section.I've decided to try out a winter capsule wardrobe even though we're halfway through the season. After doing a bit of online shopping (and returning things that just weren't right) I combined my new items with pieces I already own to create this winter capsule wardrobe. Of course, as a designer, I tend to think best when I have a visual, so creating the actual clothes and putting them together into outfits was key to figuring out what I should keep/buy.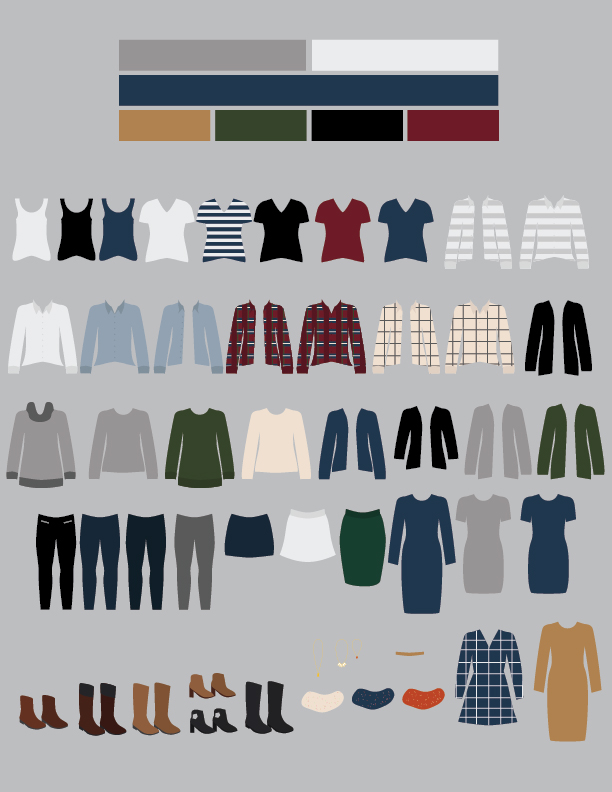
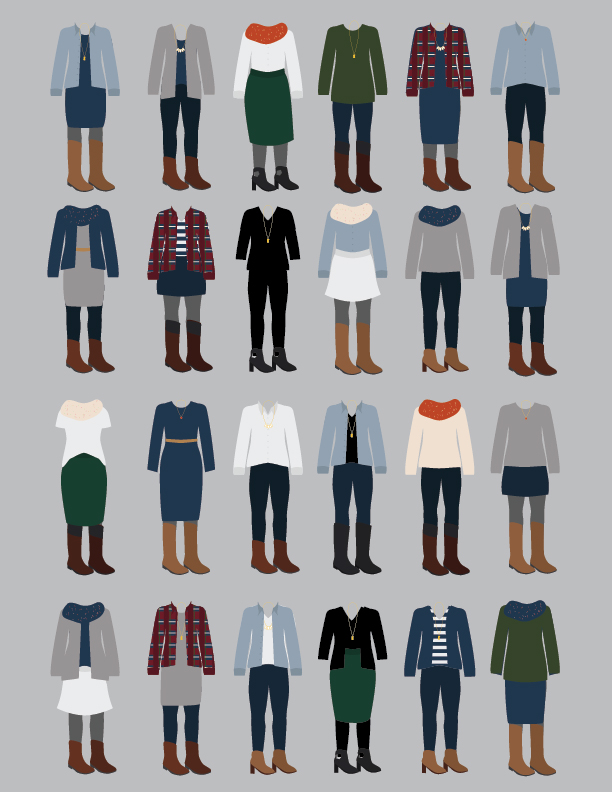
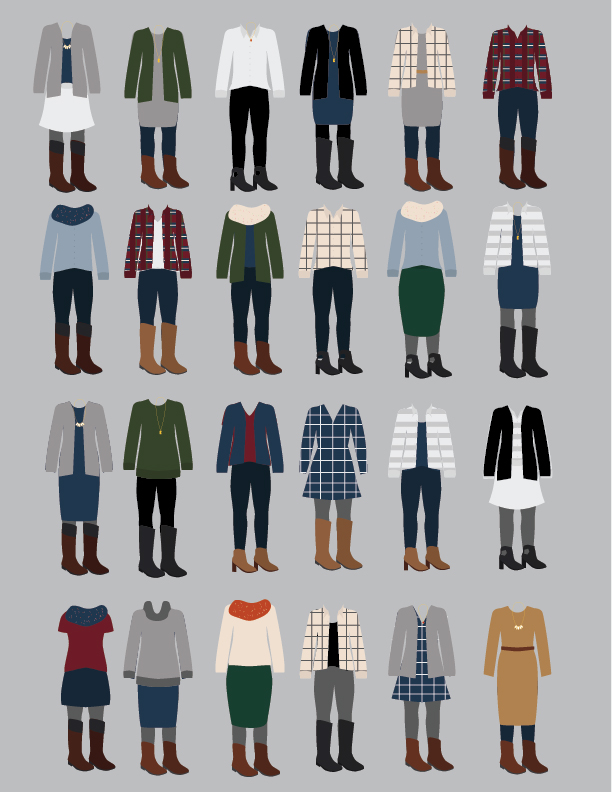 So that's where I'm at with it! Everything that I purchased was, of course, on clearance. But I really tried to only buy things I would wear all the time and if they didn't fit I brought them back. I'm excited to stick with my capsule and see how much wear everything gets. These outfit layouts are going to be my cheat-sheets for when I'm feeling uninspired.
A Weekend in Granville
After attending a conference in L.A. earlier this week I was able to spend the weekend in Granville with my family. Brad surprised me at the airport and we were able to relax for a day or two before going back to work on Monday. The weather was fantastic all weekend and we got to spend a good chunk of time outside enjoying the short Ohio autumn.
Dogs
[sucarousel source="media: 857,858,859,860,861,862,863,864,865,866,867,868,869,870,871,872,873,874" link="image" width="800" height="380" title="no" mousewheel="no" autoplay="0"]Walking to the Market
[sucarousel source="media: 875,876,877,878,879,880,881,882,883,884,885,886,887,888,889,890" link="image" width="800" height="380" title="no" mousewheel="no" autoplay="0"]The Farmer's Market
[sucarousel source="media: 891,892,893,894,895,896,897,898,899,900,901,902,903,904,905,906,908,909,910,911" link="image" width="800" height="380" title="no" mousewheel="no" autoplay="0"]Lunch at the Granville Inn
[sucarousel source="media: 912,913,914,915,916,917,918,919,920,921,922,924,925,926,927,928,929,930,931,933" link="image" width="800" height="380" title="no" mousewheel="no" autoplay="0"]Hope Timber
[sucarousel source="media: 934,935,936,937,938,939,940,941,942,943,944,945,946,947,948" link="image" width="800" height="380" title="no" mousewheel="no" autoplay="0"]The Denison Bio Reserve
[sucarousel source="media: 949,950,951,952,953,954,955,956,957,958,959,960,961,962,963,964,965,966,967,968,969,970,971,972,973,974,975,976,977" limit="30" link="image" width="800" height="380" title="no" mousewheel="no" autoplay="0"]DIY Flowing Blouse with Open Straps
Today I bring you a tutorial on how to take an existing shirt, create a pattern from it, and stitch it up. The most time consuming piece of this shirt was creating the bias tape. Basically, it's quite simple. First, you take a woven shirt that you like the fit of. Pin the back and front together on the center folds, pinning the armholes together as well. Place tracing paper over the shirt and trace around the outline, slightly shaping the side seam.
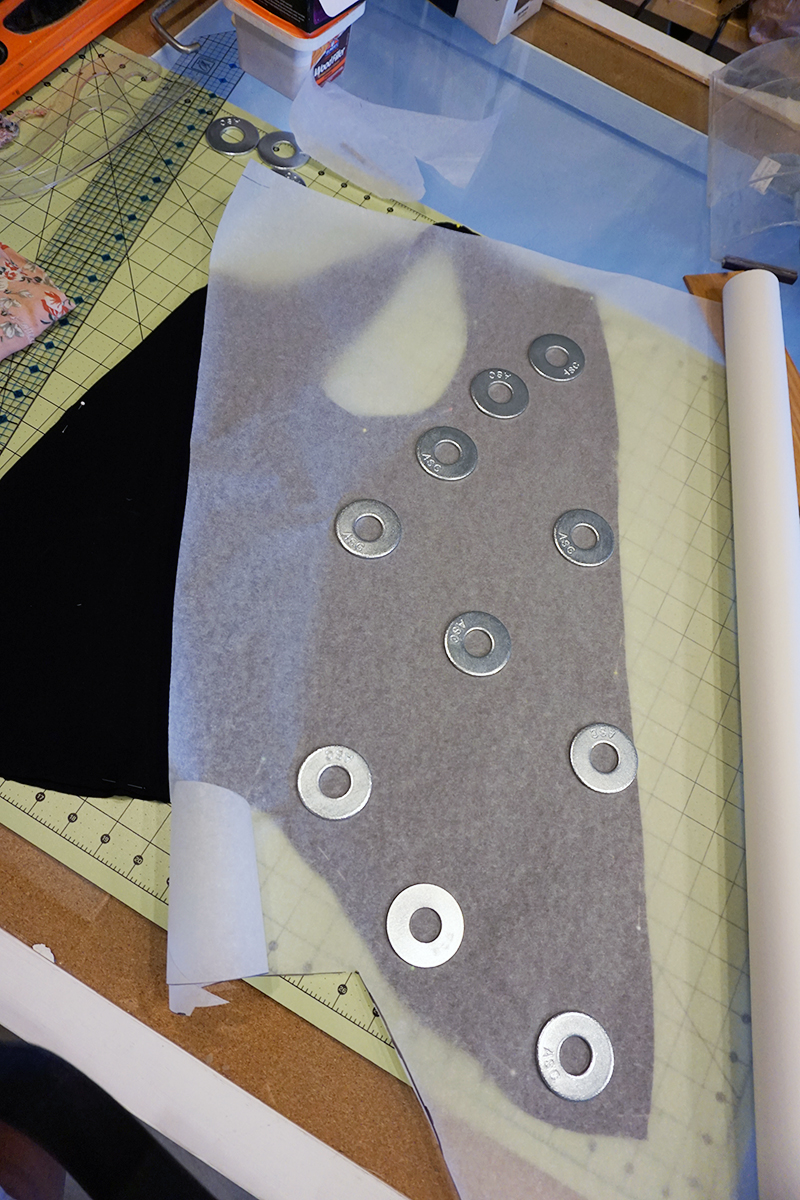
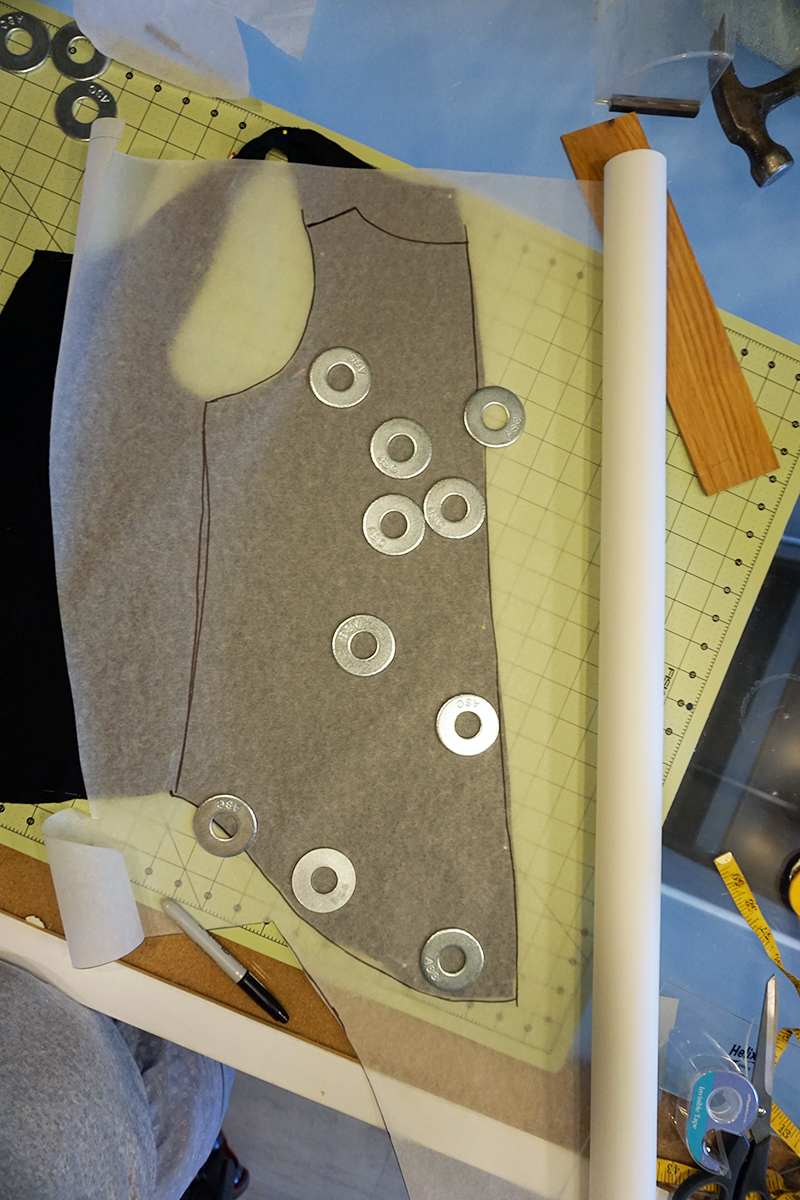
 Label the pattern piece with all relevant info and mark your seam allowances (I used 5/8"). Shorten the length of the straps so that you can use bias tape later to create them.
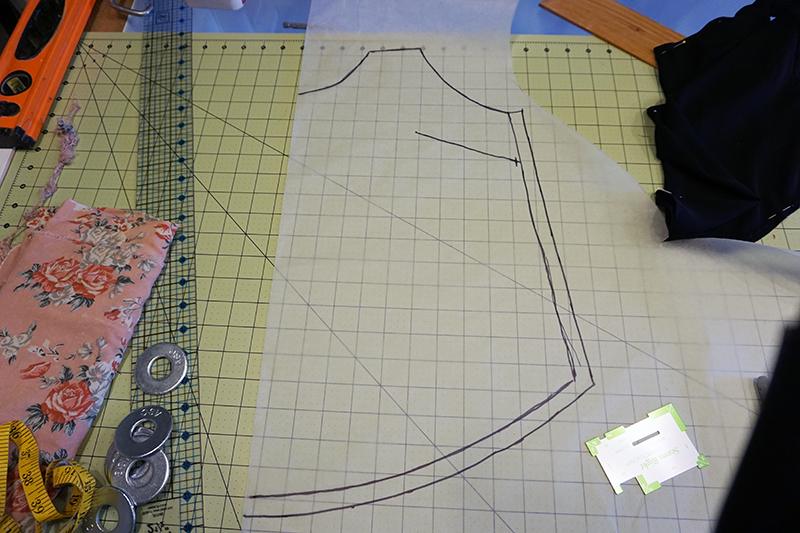 Trace the front piece and include any darts.
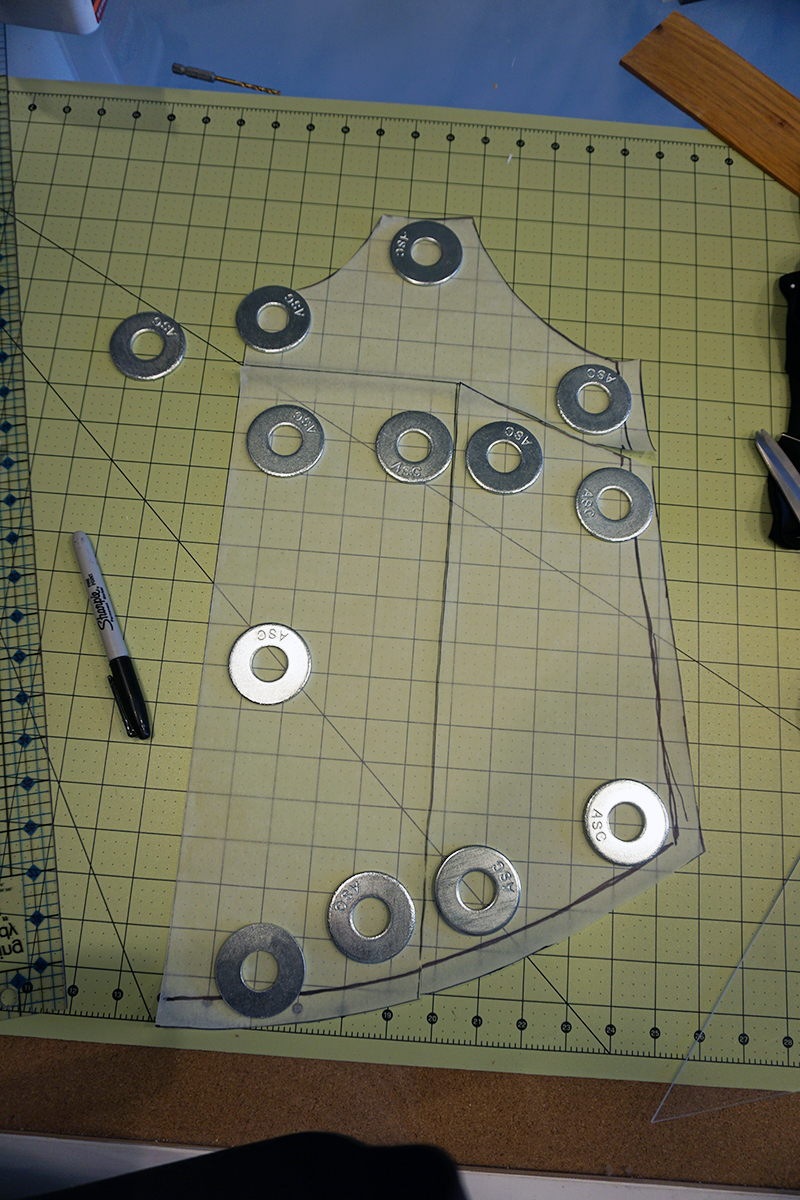 Mark a line from the dart point to the bottom of the shirt and from the dart point over to the center front. Cut these lines, including the dart.
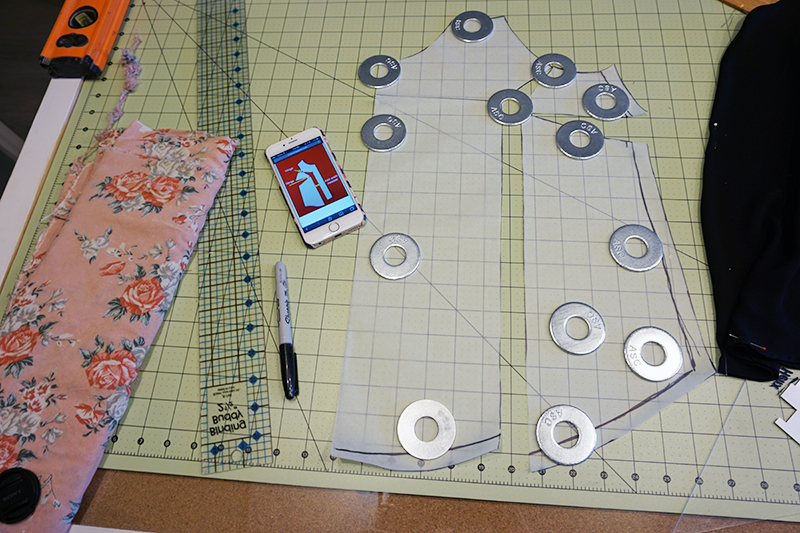 Measure the dart in the shirt to see how far you need to spread the dart. If the dart is 1/2" on either side of the fold you will need to spread it 1". Spread the dart so that you have the right measurement.
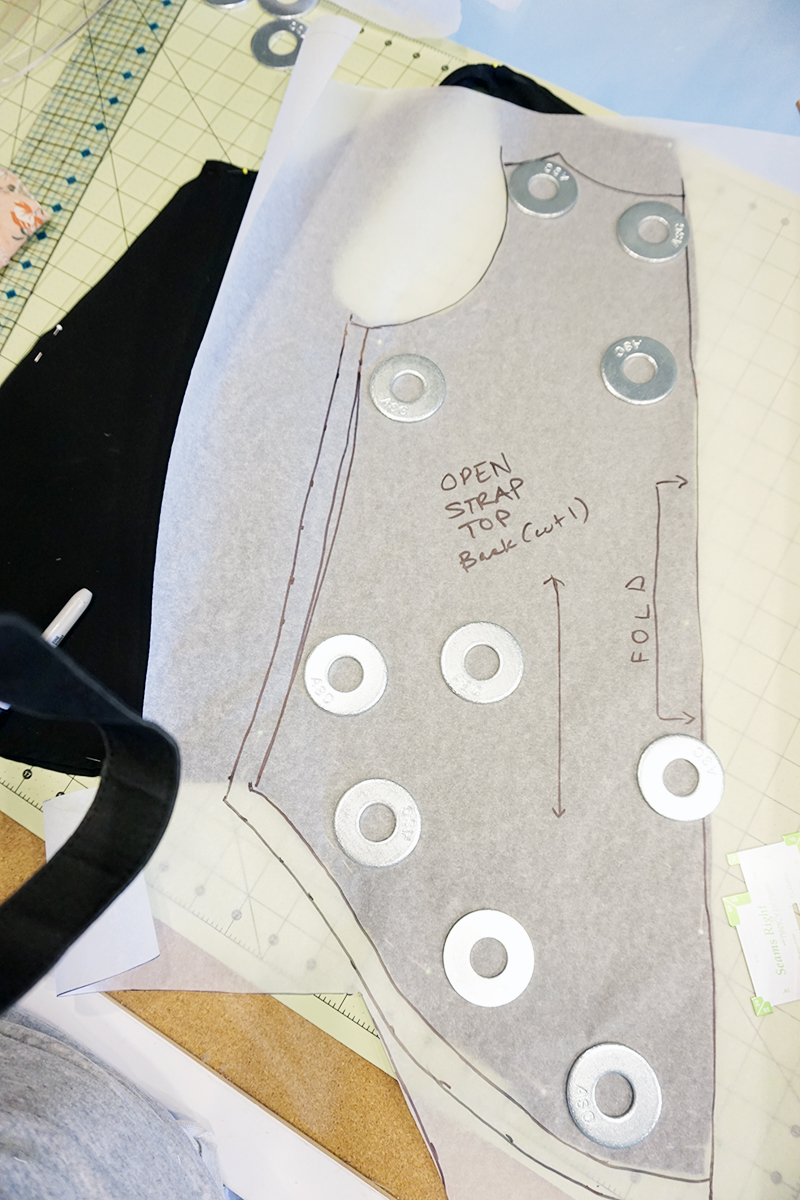
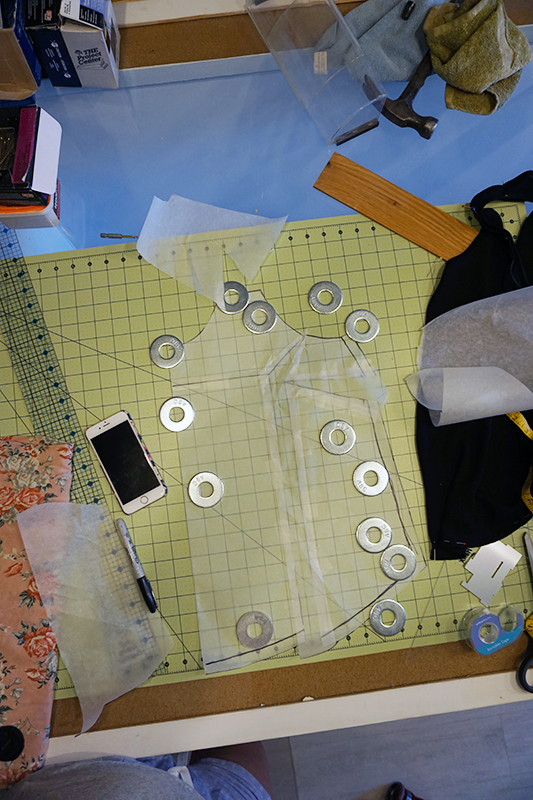 Slide paper under the cut pieces, tape everything together and re-draw the bottom hem lines and sleeve line.
 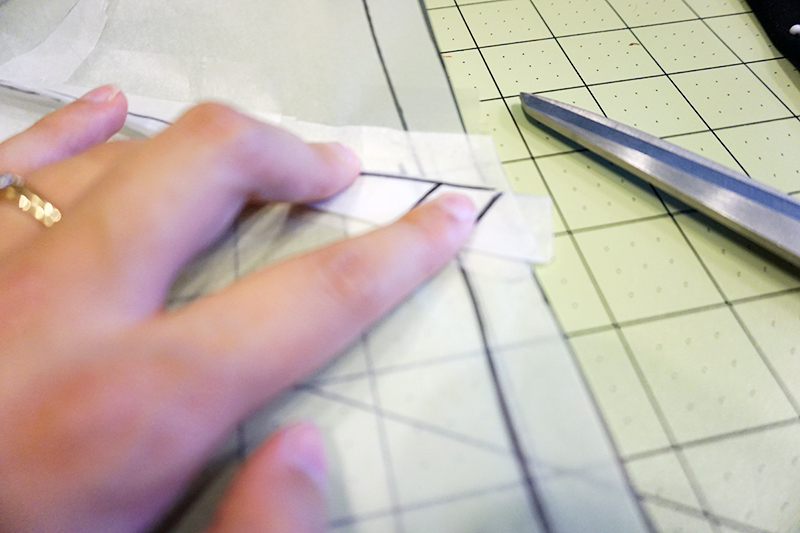 Fold the dart to mark the seam lines (ignore my mistake lines).
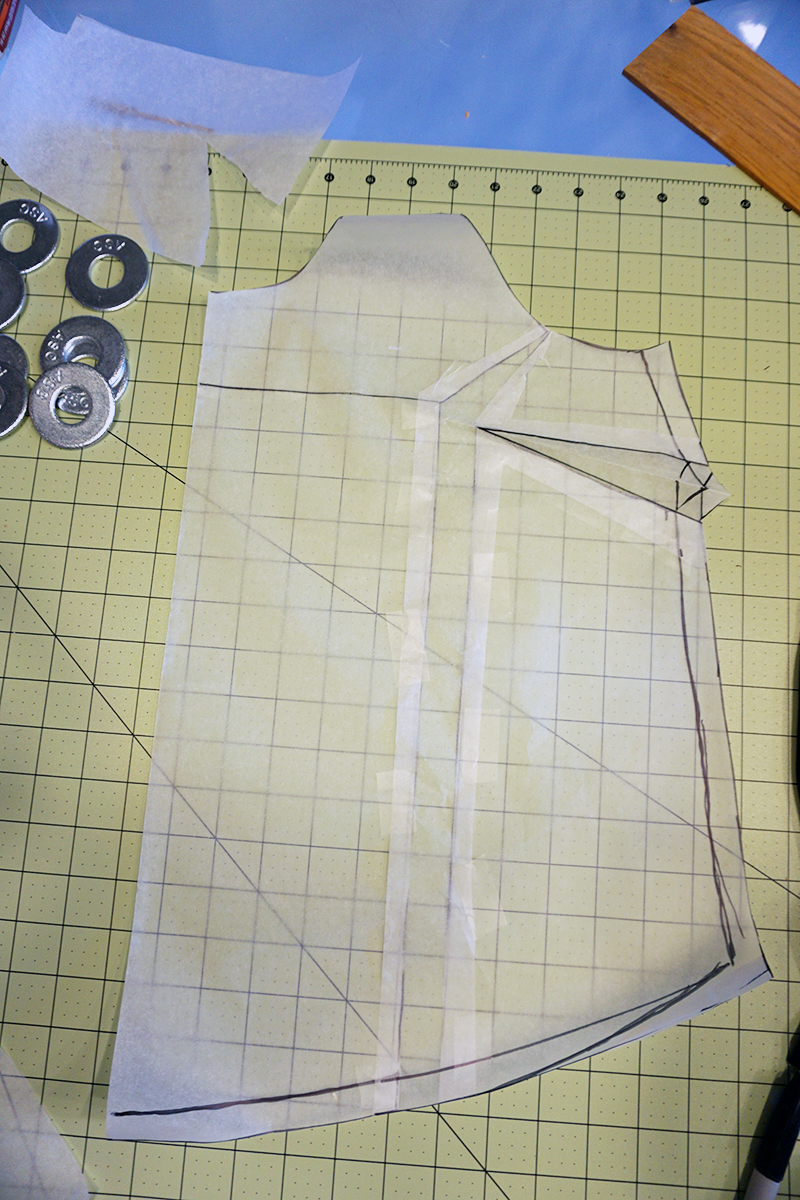 Ta-da! You have a front shirt piece. Cut all of the excess paper off.
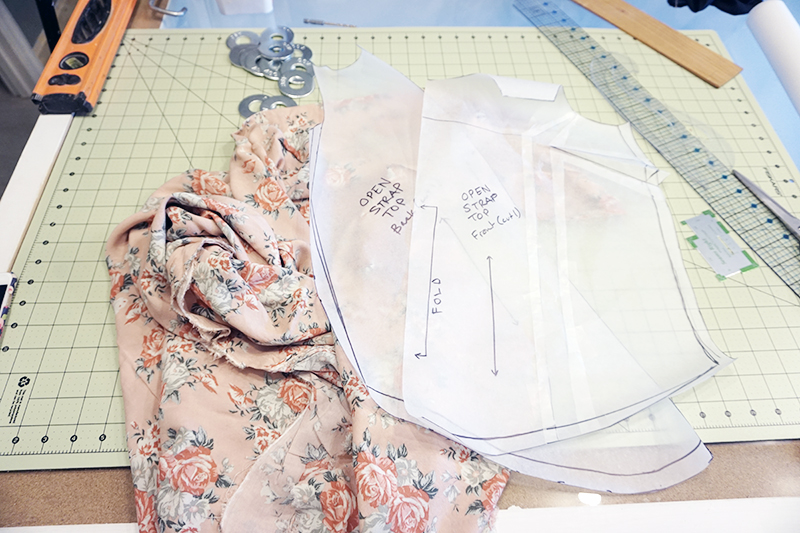 You should only have two pieces for this pattern, a front and back. They will both be cut on the fold.
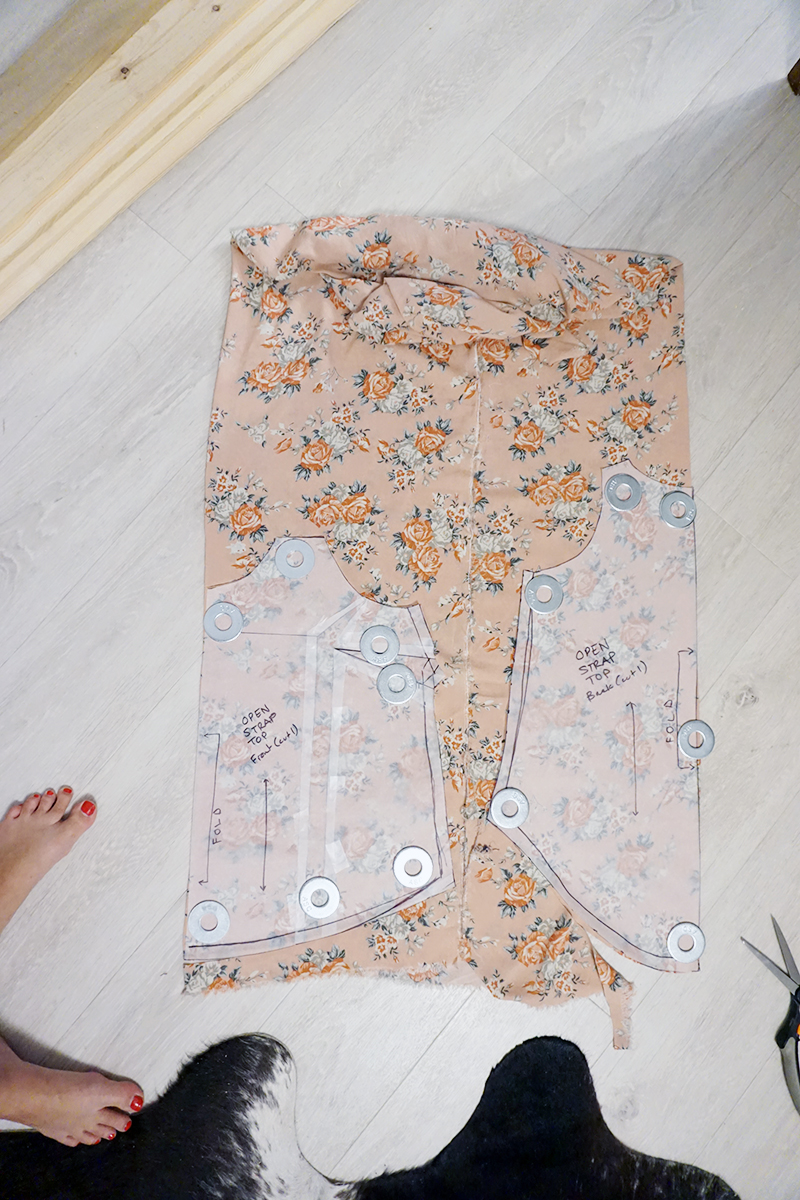 In order to cut both pieces on the fold, bring the selvedge edges to the center of the fabric and lay out your pattern pieces.
 Make some bias tape. I made a ton using this tutorial: http://whip-stitch.com/continuous-bias-tape-tutorial/
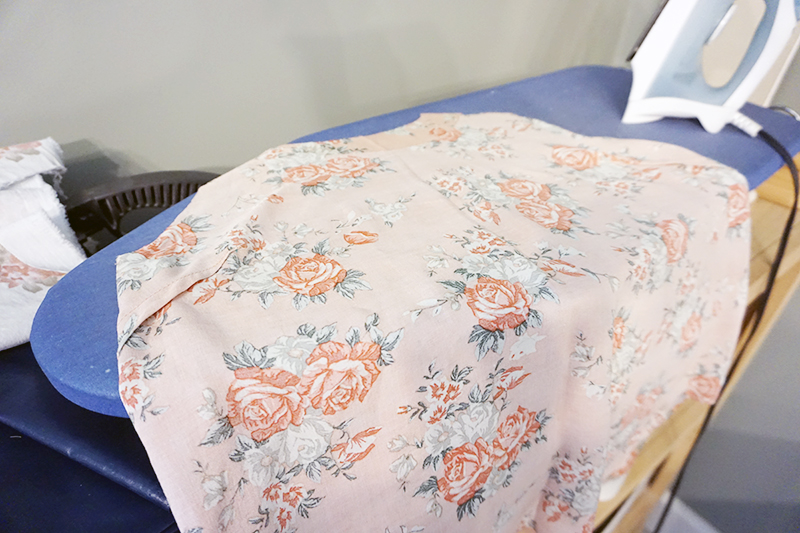 Sew the front and back pieces together at the side seams. I used french seams.
 Pin and sew bias tape across the tops of the straps.
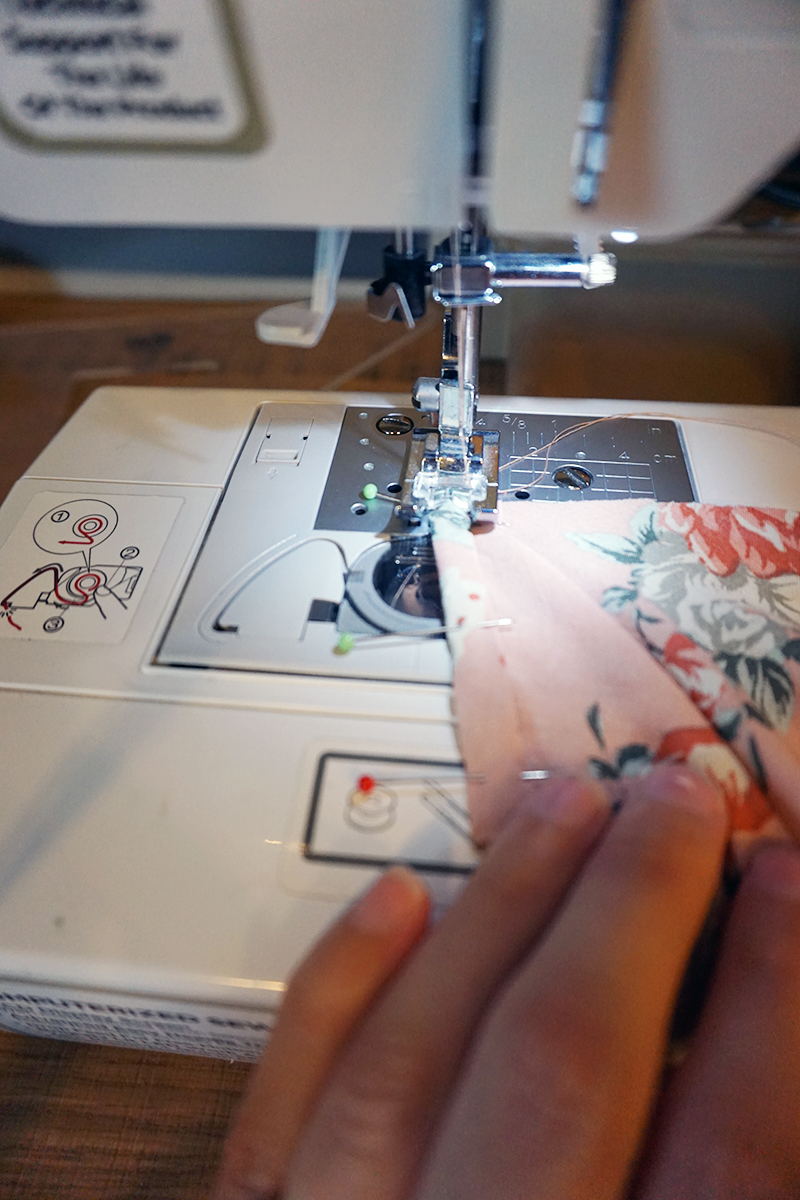 Stitch bias tape around the whole neckline and back, using your original shirt as a guide for the length,
 Stitch bias tape around each armhole, again using your original shirt as a guide for length. Hem, using a narrow hem or bias tape.
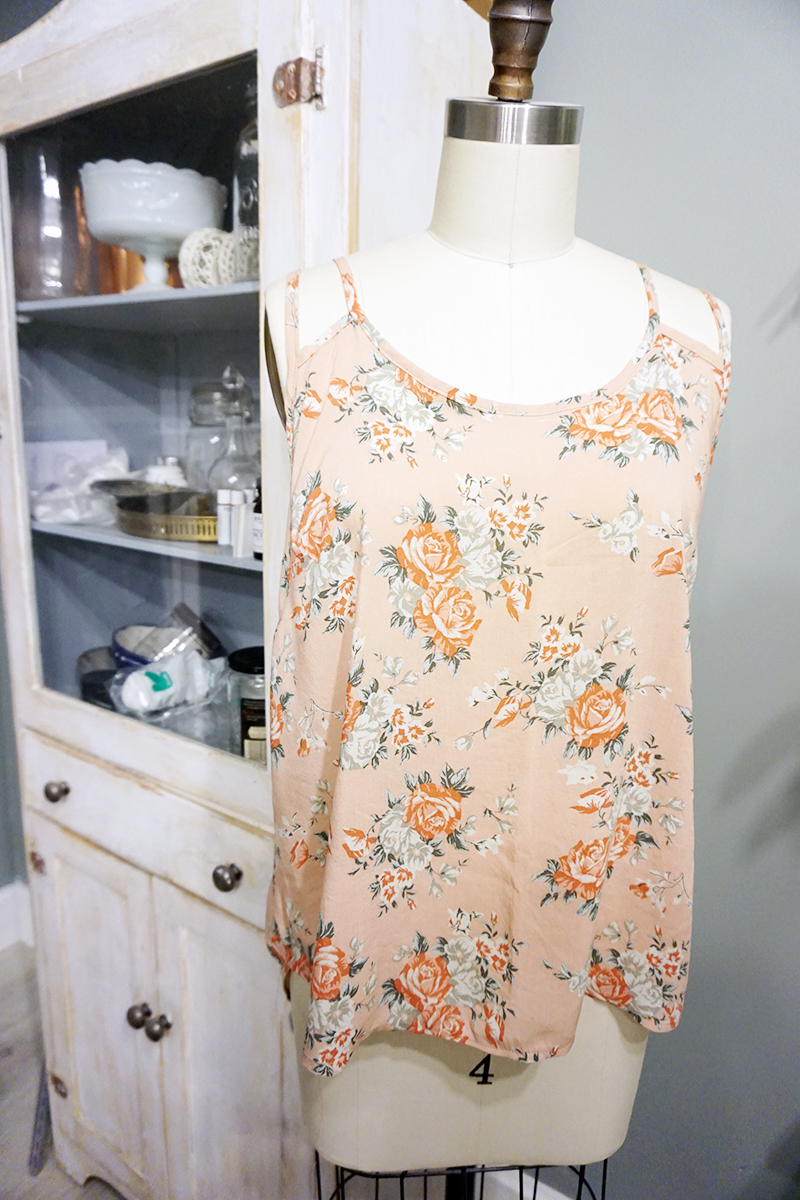 Your flowy, open-strapped tank is done!
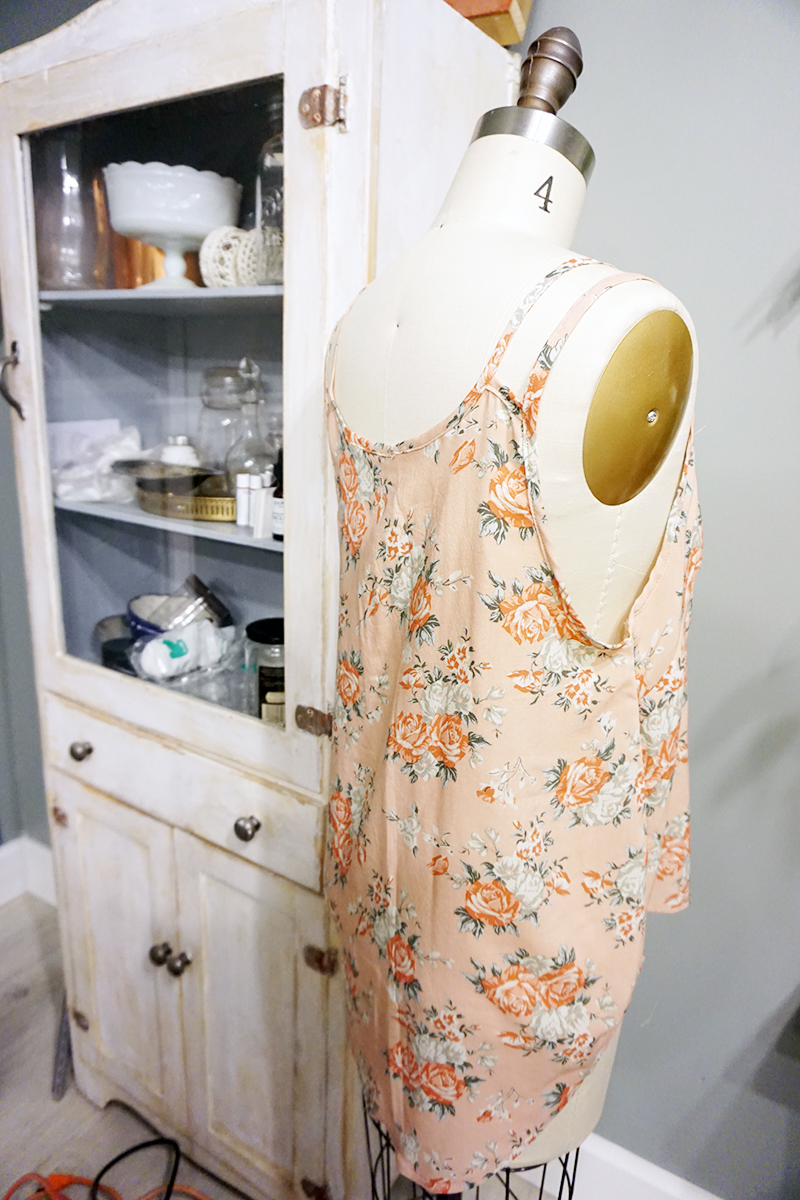
2015 Fall Sewing Plan
After seeing Lladybird's sewing room tour and her brilliant corkboard with line drawings of patterns matched up with fabric I decided to do something similar to plan my fall/winter wardrobe. Also, I have a cart full of fabric from fabric.com and I needed to actually figure out what I would use it all for and how much I needed to buy.As I was copying/pasting the fabric swatches into a document I began to notice some color trends:[responsive] [/responsive]So we're looking at plum, blush pink, coral, camel, dark teal, turquoise (of course), soft royal blue and navy blue. Looking pretty good for fall! Darker, desaturated colors but not completely boring. I think planning like this is really going to help me break out of my usual color choices.The next step was taking all my fabric choices and figuring out which patterns would work for them. I tried (and succeeded!) to only use patterns I already own. A little photoshopping, laying them out in Illustrator and ta-da! The 2015 Fall/Winter collection has emerged:[responsive]
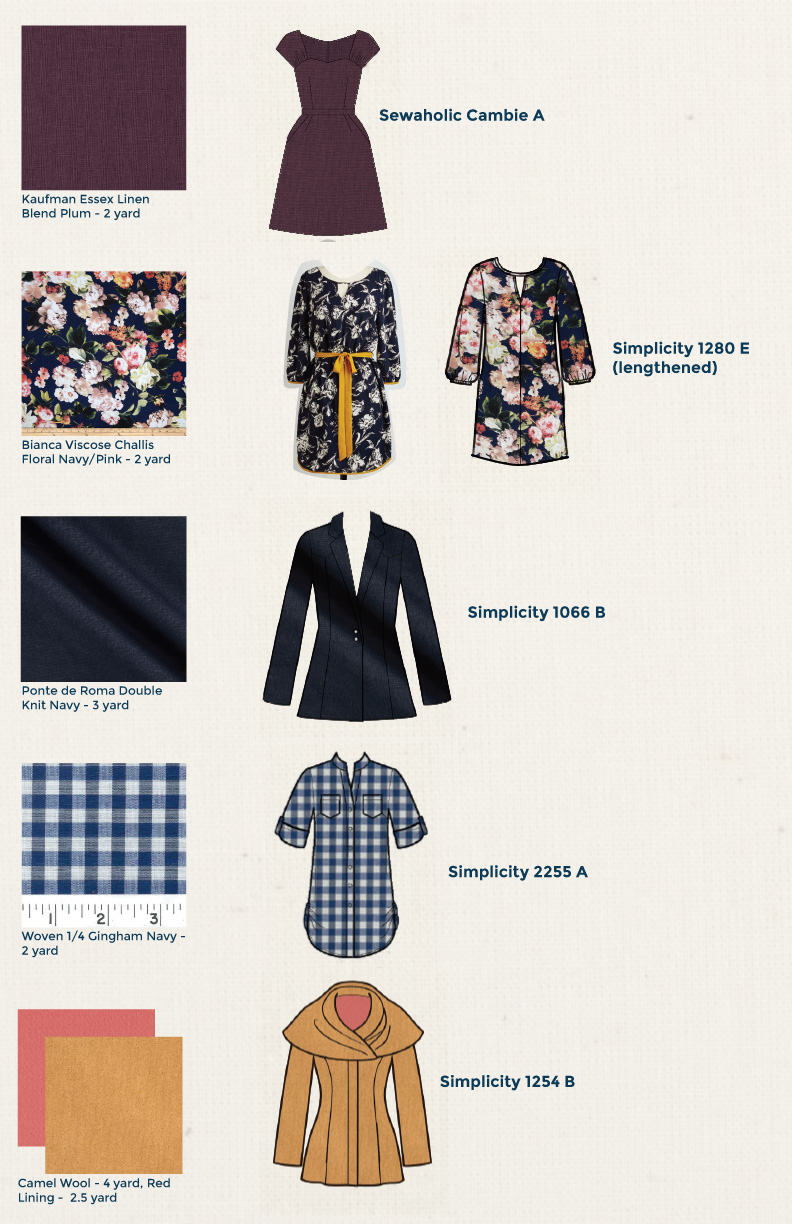 [/responsive]1. Fabric | Pattern2. Fabric | Inspiration | Pattern3. Fabric | Pattern4. Fabric | Pattern5. Fabric | Pattern (camel wool already purchased)[responsive]
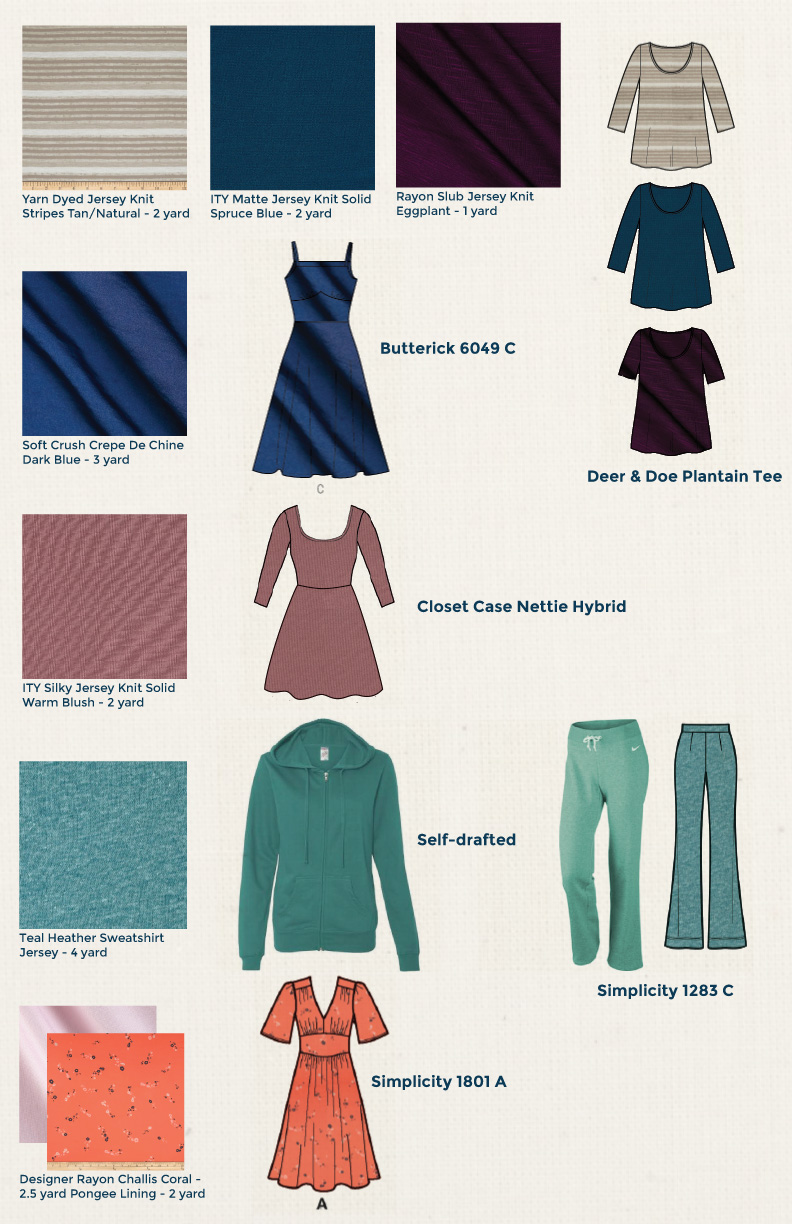 [/responsive]1. Fabric | Fabric | Fabric | Pattern2. Fabric | Pattern3. Fabric | Pattern4. Pattern (fabric already purchased)5. Fabric | Fabric | Pattern The breakdown:1 Wool Jacket1 Ponte Blazer1 Button Down Shirt5 (!) Dresses1 Zip Up Hoodie1 Pair Stretchy Pants3 Jersey Tees (2 long sleeve, 1 mid) It does seem like a lot of dresses, but I love how easily they transition from summer > fall > winter (with tights). Some of them also feature long sleeves and should work well for cooler weather.I don't have any pants on the list other than some comfy sweat pants but I do have denim to make another pair of Gingers if I feel so inclined. My jeans stock is already pretty full, though, so I don't really need another pair. I also have some fabric set aside for a quick summer tank top with some pink floral rayon challis, an open front sweater with some gray slub knit and a sleeveless button down tank top with some yellow patterned cotton. So...we'll call those projects "end-of-summer" plans.Also, Brad wants a shirt. I hilariously miscut the pattern and fabric pieces for Brad's shirt assuming he would be the smallest size. I had him try on the pieces once the front and back were joined and I might as well have made it for a child. No idea why I didn't measure him first to check. A serious brain fart moment.This seems like a daunting list, but I'm excited to tackle it! On to the sewing machine...
Nettie Summer Dress
Buying fabric online is always a bit of a challenge...There's just no good way to tell how heavy or light a fabric will be without ordering a swatch (and who has time for that?). So when I ordered a floral knit from fabric.com I wasn't sure what to expect. I was hoping for something thicker to make a nice circle skirt out of but I ended up with a lightweight jersey that would be great for a t-shirt. Except I had 2 yards and no need for a floral tee.It sat in my stash for a few months until I finally found the perfect pattern to suit its lightweight, stretchy nature. Enter the Nettie Bodysuit pattern from Closet Case Files. This pattern was made for 4-way stretch fabrics and has a body-hugging fit with negative ease. In order to make it a dress I just cut my bodice pattern pieces to end around my waistline and used a previously drafted 1/2 circle skirt pattern. Even though the two pieces weren't exactly the same size at the bottom I just pinned them together in few places and held the tension evenly, which worked out just fine.responsive]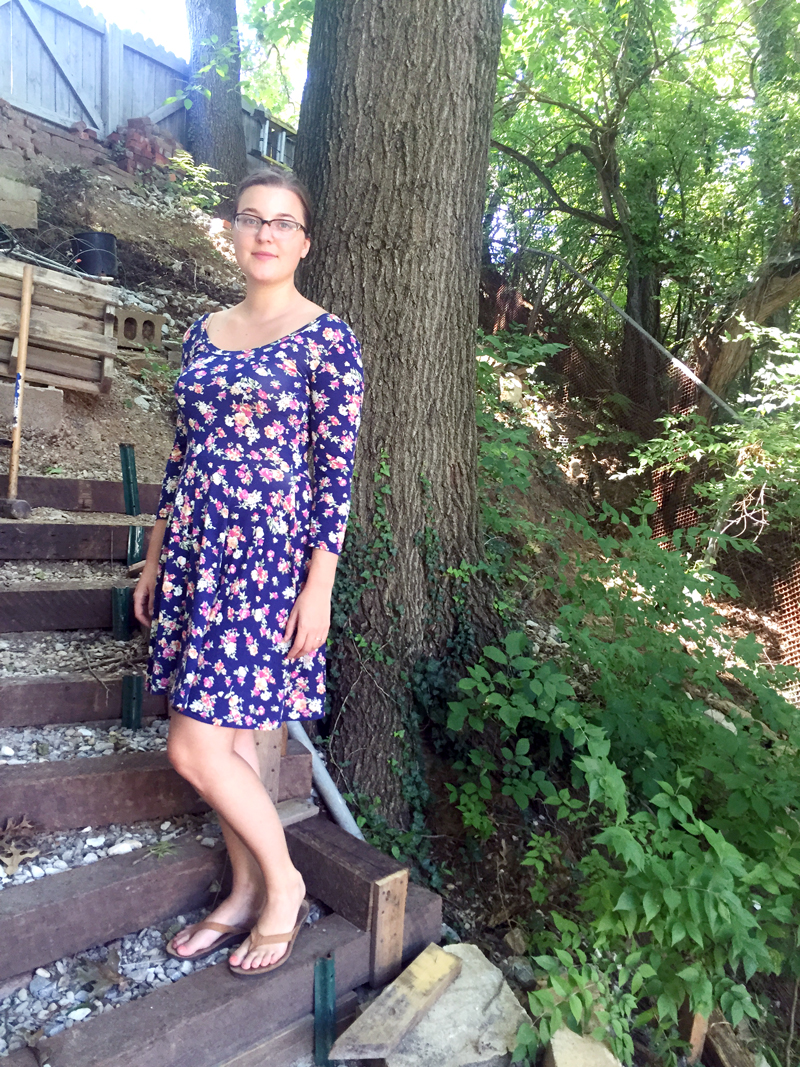 [/responsiveHere is the step-by-step process:1. Iron fabric and cut out pieces. I ended up folding the selvedge edges to the center of my fabric so I could use the fabric economically and cut the bodice pieces on the folds.2. RST, serge shoulders, stabilizing with clear swimsuit elastic.3. Fold binding in half lengthwise (WST), press, then sew up short edge of neck binding (RST). Attach it to the neckline using pins spaced out evenly. Raw edges should be together and the binding should be touching the right side of the bodice fabric.4. Serge binding to neckline, flip, press and top stitch about 1/8" from the seam over your serged edges.5. Attach sleeves to the bodice flat. Just try not to stretch them too much and pin evenly.6. Attach skirt front and skirt back to bodice bottom. Pin evenly, and as you're serging, use clear swim elastic to stabilize the seam and keep it from sagging.7. Hem sleeves and skirt (I folded up the fabric once and topstitched using a double needle.) I discovered at this point that hemming a circular skirt is way easier with knit fabrics than wovens.8. Serge the side seams from the sleeve hems to the skirt hems.9. Try on and adjust side seams as necessary. I had to take it in at the waist a little bit, but this might not have been needed if the fabric was heavier.[responsive]
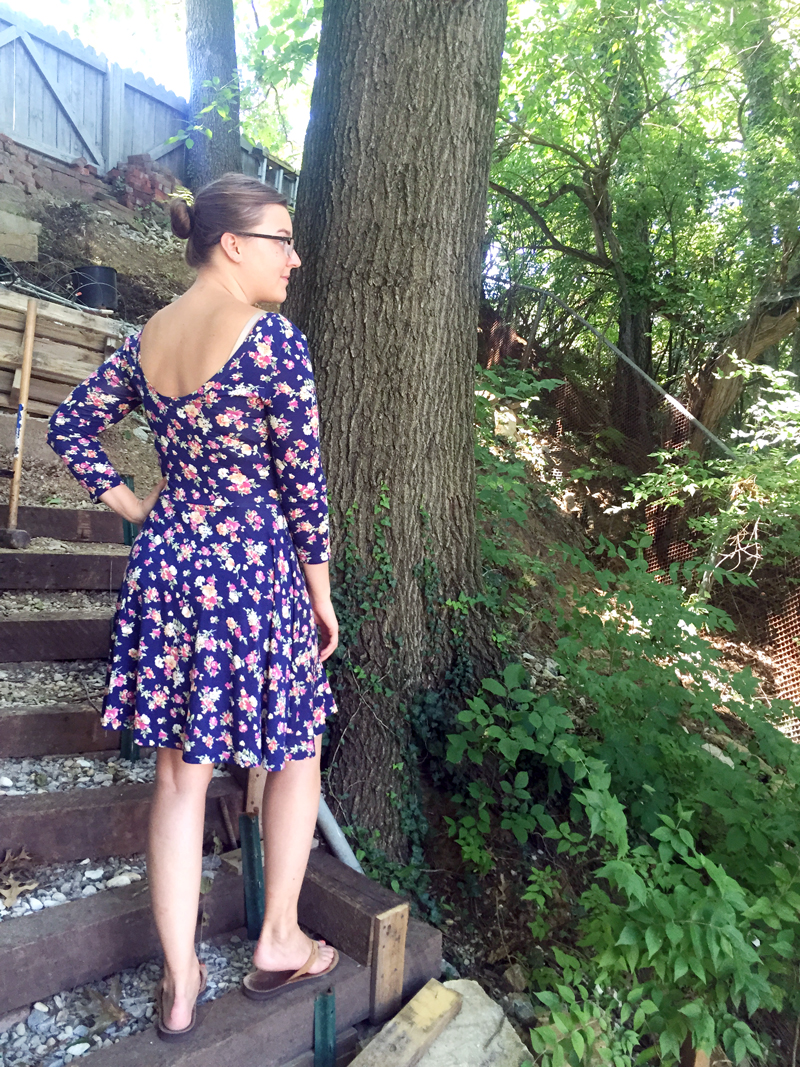 [/responsive]That's it! It sewed up in about 3 hours and may be one of the most comfortable dresses I've ever made. I chose to do the medium back, scoop front and 3/4 sleeves with a 20" long skirt. Next time I may choose to do a higher neckline in the front or back because the sleeves do tend to slip off my shoulders. Another way I could work on that problem would be to extend the shoulders a little bit toward my neck. One other tiny thing: I think the weight of the skirt is pulling down the waistline a little bit so I would shorten the waist by 1/2" to 1". Technically you should also let the skirt pieces hang on a mannequin to let the bias stretch before trimming the hem to an even length again buuuut we already discussed how I'm impatient and don't have time for that. I'd rather have a slightly uneven hem and be able to wear the garment asap.All in all I'm super satisfied with my new floral summer dress!
First Pair of Ginger Jeans
I bought my first indie sewing patterns from Sewaholic and Closet Case Files a few weeks ago. The one I am probably most excited about is the Ginger Jeans pattern. I've never seen such a nice-looking skinny jeans pattern made for curvier ladies and it even comes with two versions (high-waisted skinnies and low-waisted stovepipes).After researching other people's makes and reading through the sew-a-long multiple times I felt ready to move forward with making my first pair of jeans out of some weird floral stretchy denim ($2 a yard!).I have to say, I am most pleased with how neat and clean my front fly turned out. My topstitching actually turned out pretty nice, too, although I just used regular thread for these practice jeans. I didn't use any rivets or even a jeans button, opting instead to use two regular buttons.Unfortunately the fit really wasn't working for me, so I had to make quite a few adjustments. Based on my measurements I cut a size 12, grading to 14 at the hip and back to 12 for the waistband. I ended up taking a wedge out of the back yoke, stitching four 1/2" darts in the waistband, taking in the sides at the hips by almost 1 1/2" and the fit still wasn't right. So I took in the inseam at the crotch by about 1 1/2" and flattened out the front crotch curve. I probably should have left the crotch alone and instead taken in the waist even more because they went from high-waisted to about 1/2" below my belly button. I also tapered the calf area by about 1 - 1/2" from the knee on either side.Luckily, I had basted the seams, so I was able to adjust the fitting quite a bit. I'm not sure if it was my fabric choice (the denim is very lightweight and pretty stretchy) but the size I cut just overall seemed way too big. I have some heavier stretch denim (that I used for Brad's apron) and hopefully it will work better.The adjustments I plan on making to the next pair are: cut a straight size 12, make a swayback adjustment to the yoke and waistband, place the zipper a little closer to the fly, shorten pocket length and I may omit the pocket stays. I like the idea of pocket stays but I don't like that I can actually see the bottom of the stays through the pants fabric. There are definitely some issues with the jeans but they were great practice for several new techniques and I feel like I have a better understanding of how to fit pants.Disclaimer: If you keep scrolling you will see my half-baked attempts to photograph myself, awkward facial expressions, gratuitous booty shots and at least one awkward crotch shot. Scroll at your own peril.[responsive] [/responsive][responsive]
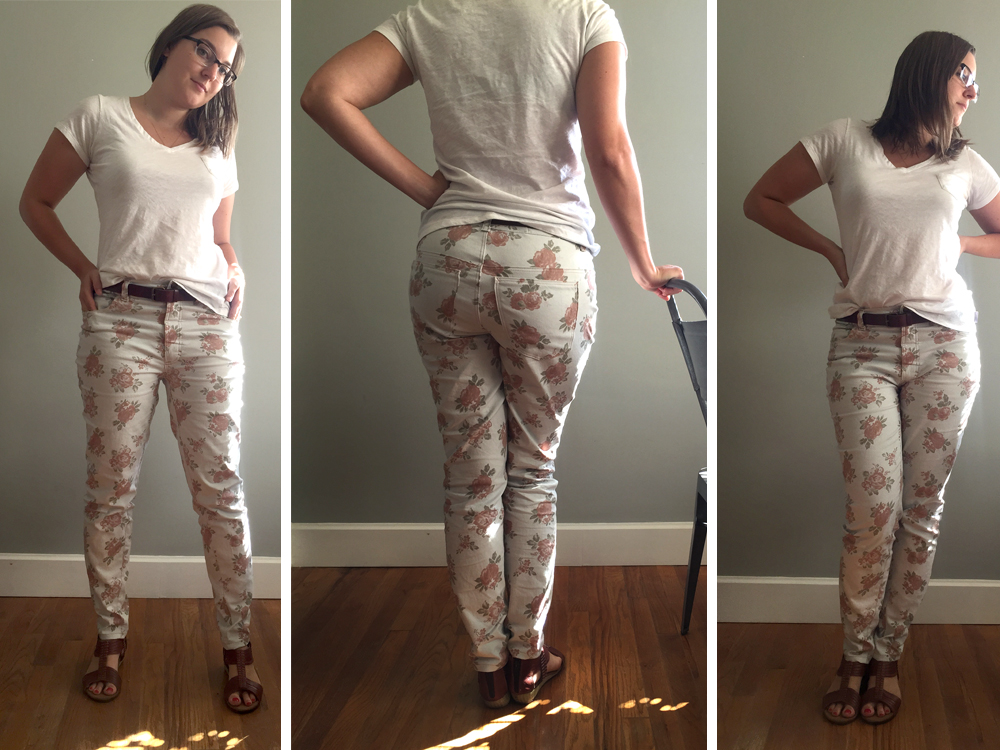 [/responsive][responsive]
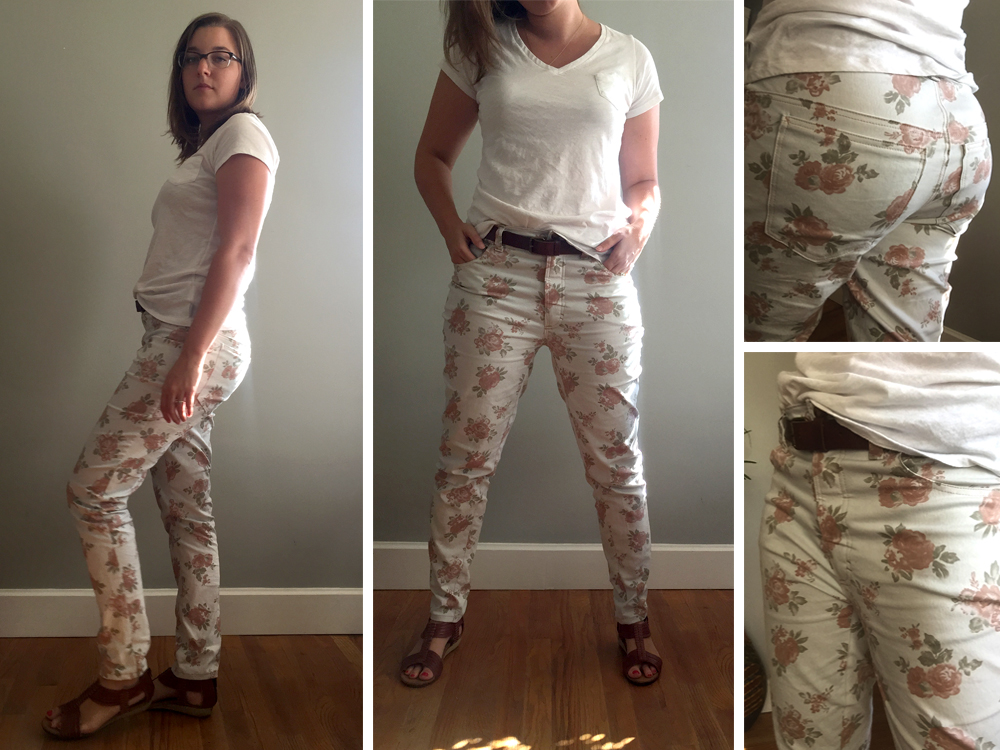 [/responsive]
Pattern Review - Simplicity 1755
[responsive]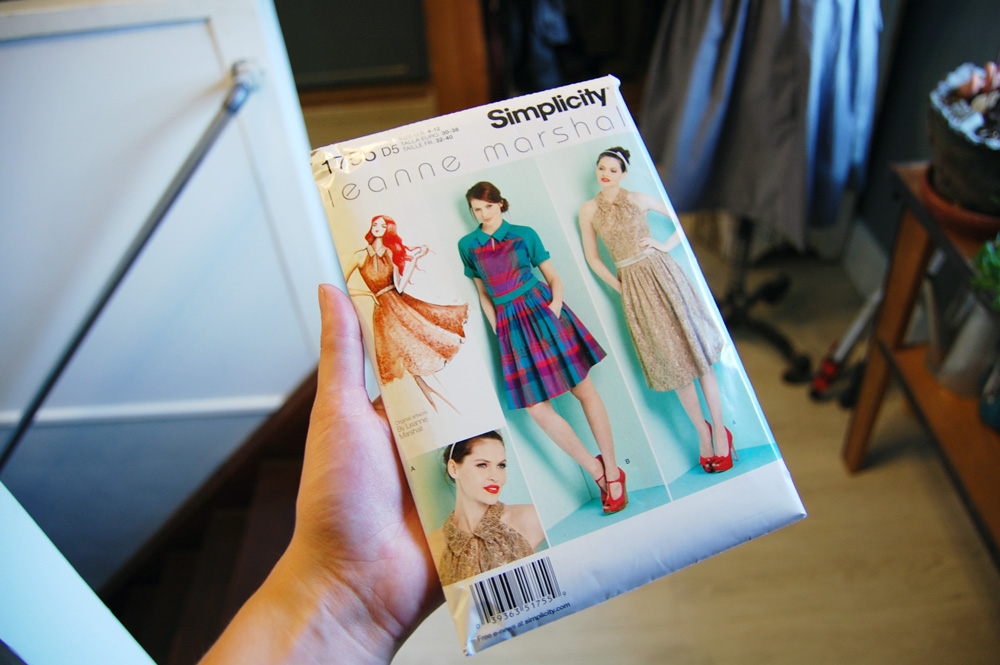 [/responsive]I've been on a sewing binge lately, hitting up the fabric stores...ordering a serger...lying awake at night dreaming up my next project...it's getting out of hand. The first sewing project I decided to make during my latest binge was Simplicity 1755 in view A, a Leanne Marshall pattern. I really like the unique neckline, preppy collar, angled raglan-style seam lines and the delicately pleated skirt. All those features make this pattern a little less versatile, but I can see making some frank-en-patterns with the pleated skirt attached to a different bodice, or the bodice turned into a peplum with a little circle skirt.I cut a straight size 12 after double checking to make sure the waist wasn't going to have too much ease. (My measurements are 36" bust, 31.5" waist, 42" hips.) It fits perfectly with no alterations! A big four miracle. The fabric is an inexpensive chambray from Hancock Fabrics. I found it lying in the apparel flat fold pile and thought the weight would be perfect for the structure this dress has. And now you will be subjected to my solo photography while the sun is setting struggles. I'm sure the neighbors were highly amused by my antics (walking in high heels in the mud, trying to avoid doggy land mines, changing the angle of the tripod, etc.)[suslider source="media: 782,783,786,785,784" link="image" width="600" height="800" title="no" pages="no" mousewheel="no" autoplay="0" speed="0"]The instructions were clear and easy to follow. If I make this pattern again I will wait to slip stitch the lining to the skirt until after I sew in the zipper so I can machine-stitch the lining to the zipper tape. Hand sewing isn't my favorite but I guess it's good to practice.The pleats were a little difficult to interpret on the side seams. It took me pinning the panels together at the sides to understand how they were supposed to be folded over the seam to hide it.All in all it was a quick dress to make (maybe 12 hours total) and I LOVE the look. It's kind of got a sporty 50's vibe. I also got to try out a new technique for hook and eye closures by knotting thread around itself to form a loop, sort of like those friendship bracelets everyone used to make.[suslider source="media: 780,781,788,787" link="image" width="600" height="800" title="no" pages="no" mousewheel="no" autoplay="0" speed="0"]
Shop Apron for a Handy Man
Brad's been working on the house non-stop since we moved in almost three years ago. I do what I can to help, but usually that means providing snacks and drinks and staying out of the way. Normally I'm very selfish when it comes to sewing. If I can't show it off, what's the point of spending hours hunched over the sewing machine?This shop apron for my handy hubby is the exception to my selfish sewing rule. It all started when I spotted 3.5 yards of this deep indigo denim material on the flat fold table at Hancock Fabrics (have you seen this section? I've found some ah-mazing stuff there and it's all $4.95 per yard.) The material has some stretch to it, and while that's going to be perfect for the Ginger jeans I plan on making soon, it's not exactly ideal for this apron since there's some waviness happening in the horizontal seams.(Side note: when buying new denim pre-wash it separately from other fabrics. Unless you like the slightly grayish blue tint it leaves behind on all the areas of your other fabrics that are supposed to be white. Apparently I don't.)The construction of the apron is fairly simple. I took a few quick measurements and drew them directly on the wrong side of the fabric, trying to go with the grain as much as possible by lining up the fold along the tiny twill lines.My initial measurements are on the left in the gray box and my measurements with seam allowance are on the right in the white box. I used a 1" seam allowance on each edge so the edge could be folded down 1/2", then turned under another 1/2" and top stitched. I measured just under the collarbone across the chest (8"), around the front of the waist to the side seams of his shirt (18"), from collarbone to waist (12") and from collarbone to below his knees (40").[responsive]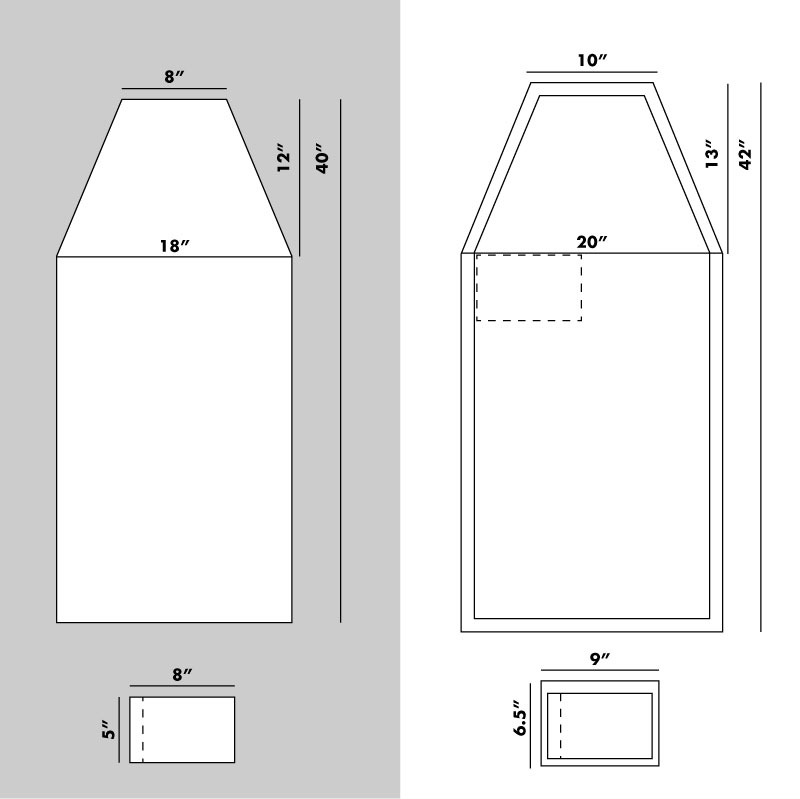 [/responsive]The dashed line on the apron shows the pocket placement, the dashed line on the pocket shows a line of stitching to create a pencil pocket and the seam allowance is a little different on the pocket since the left, right and bottom edges were just turned under 1/2" then stitched down.[responsive]
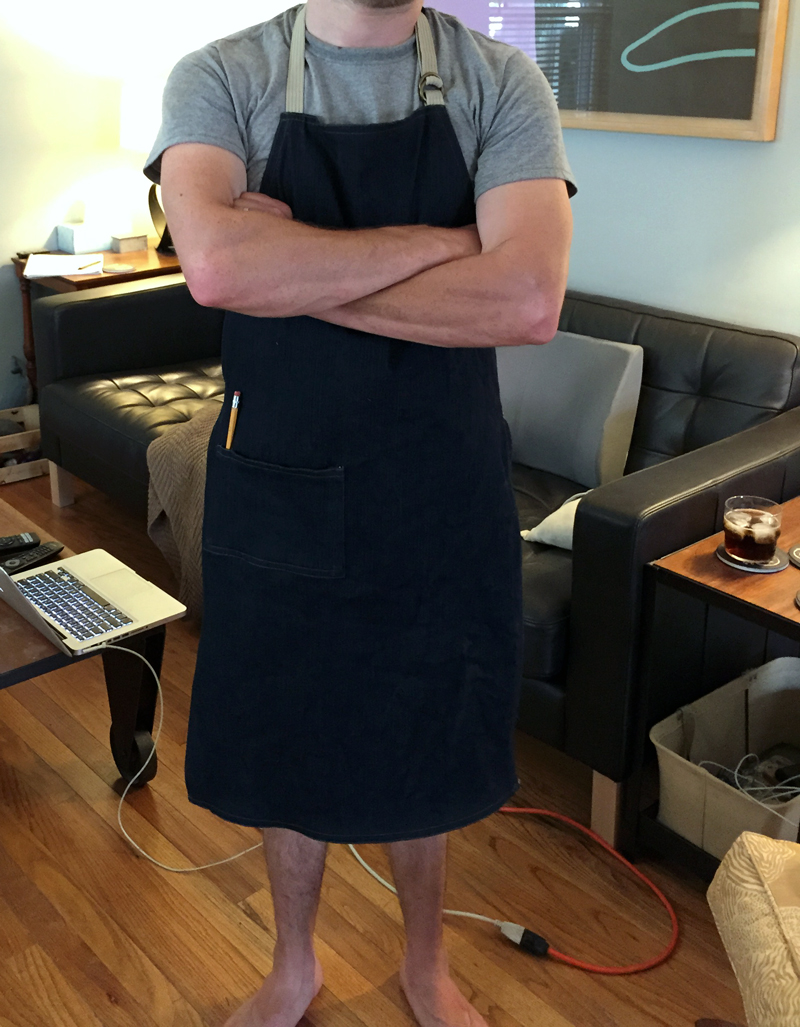 [/responsive]Please excuse the mess in the background...someday I'll get some fancy well-lit photos of this thing, but for now I'm just happy he let me photograph him in it.We tore apart an old point-and-shoot camera bag for the straps and hardware. Always save the hardware and zippers, even if you'll never use the bag and want to get rid of it! That stuff ain't cheap.The neck strap and D rings were sewn directly into the edge while I was top stitching. I had Brad put on the apron and we threaded the strap through the D rings, adjusted the length to his liking and snipped the strap. I stitched down the end of the strap to keep it from fraying and made a denim loop which I hand sewed about 3" above the D rings to keep the strap in place.The waist strap has a slider already on it, so we kept that and the buckle at the end and I just sewed a large metal ring into the other side to give the buckle something to clasp onto. I had originally planned on making all the straps out of denim (even going as far as making them and top stitching them) but as Brad was digging for D rings he found this old camera bag and we just went with it. Now I have denim straps left over...maybe a half apron for me? :)We also ended up chopping a few inches off the hem to make it easier to walk around. 40" makes a pretty long apron, but 35" seems to work well.[responsive]
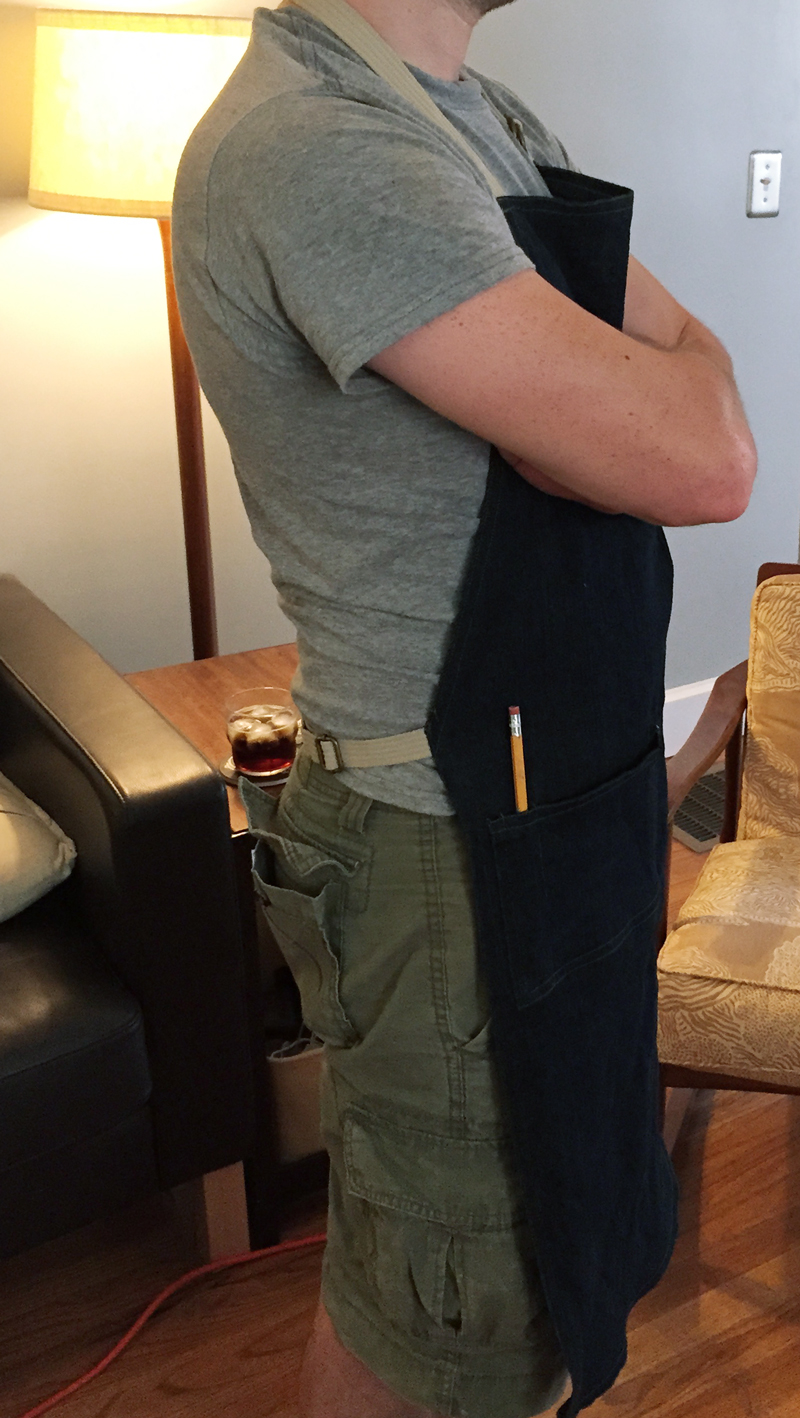 [/responsive][responsive]
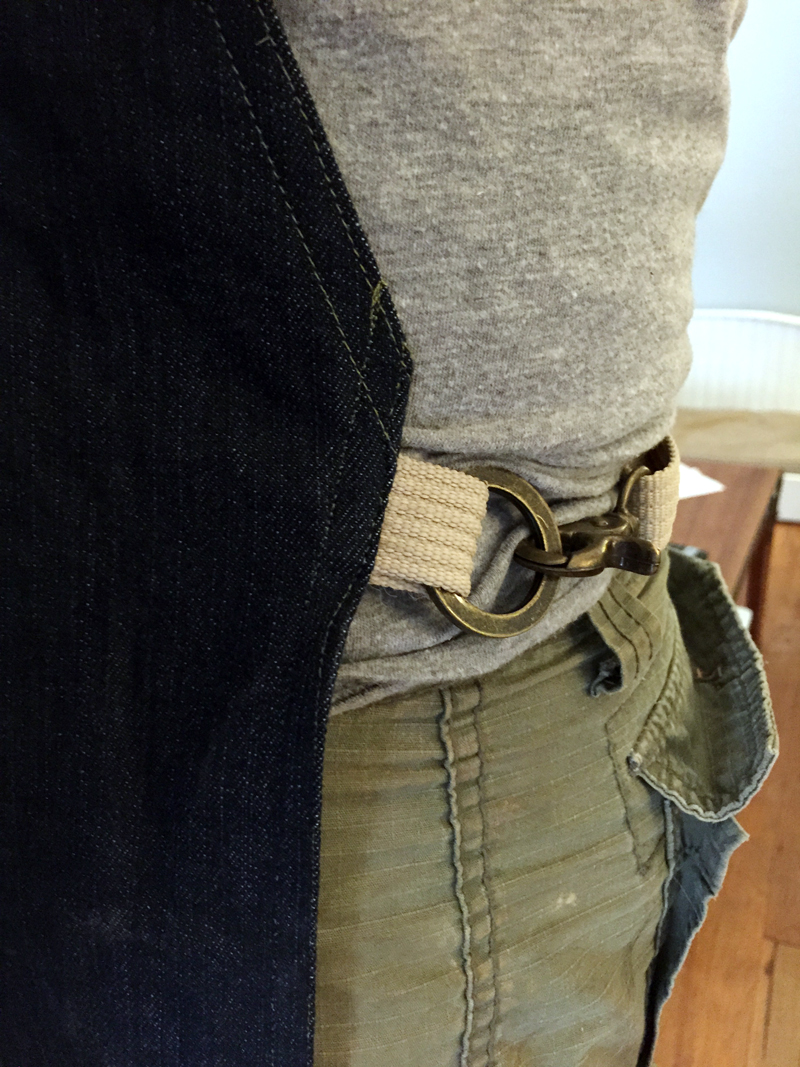 [/responsive][responsive]
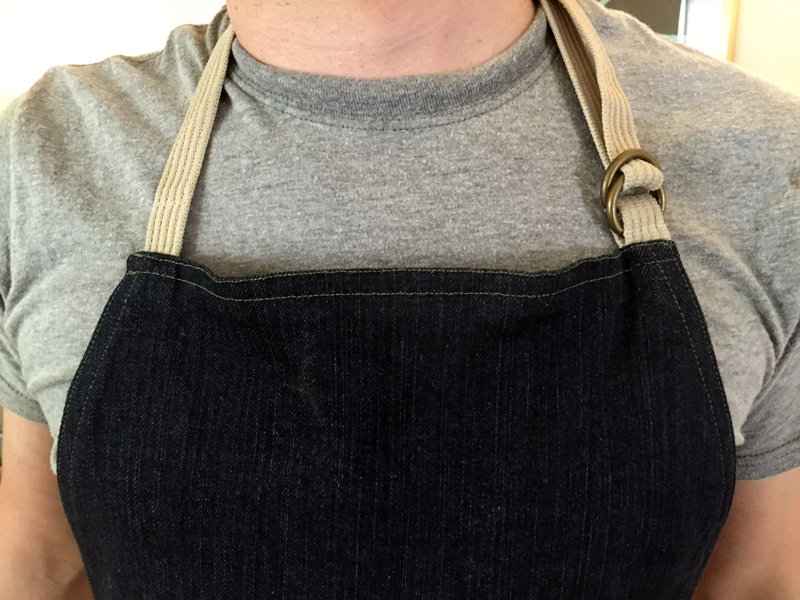 [/responsive]I discovered a foot that really helped me get even top stitching: the blind stitch foot. It looks kind of like this:
 I used the blind hem guide in the middle with a straight stitch set at 3mm to slowly sew along the edge of the fabric, then did a second line using the right edge of the foot as a guide. It seemed to work pretty well and it's good to figure these things out before moving on to actual jeans.Anyway, there it is! I foresee this shop apron getting lots of use and hopefully Brad with naturally age it by spilling bleach and get dust on IT instead of on his clothes. Fingers crossed.Are there any presser feet that you've found to be really helpful, even if you don't use it for its intended purpose?
Review of Simplicity Sewing Pattern 1801 Misses' Dresses Cynthia Rowley Collection
It's been a while since I've posted about a sewing project. Partly due to the fact that I haven't been sewing much and partly due to my newest side project...Parker Natural Care! After about 6 months of making my own products (everything from lip balm to deodorant) I decided to start a natural skin care company to share my products with the world. So far 'the world' is just friends and family, but it's growing!Anyway, my latest venture in sewing was spurred by a fabric. A beautiful, lightweight rayon challis from fabric.com. Honestly, the fabric probably wasn't the best for this project, but it still worked out. I ended up having to fully line the dress in order to make it somewhat opaque and I had to be really careful when ripping out gathering stitches because the challis is pretty delicate and shows snags easily. Also the wrong side and right side are virtually indistinguishable except in certain light.I cut a straight size 14 of this pattern after checking the actual waist measurement and making sure there wouldn't be too much ease. I figured with the way the top and skirt is gathered the fit should be pretty forgiving. That was pretty much right on, although if I make this pattern again I will probably adjust the neckline to make it higher and take a little out of the shoulder seam and a little out of each waist seam.[responsive]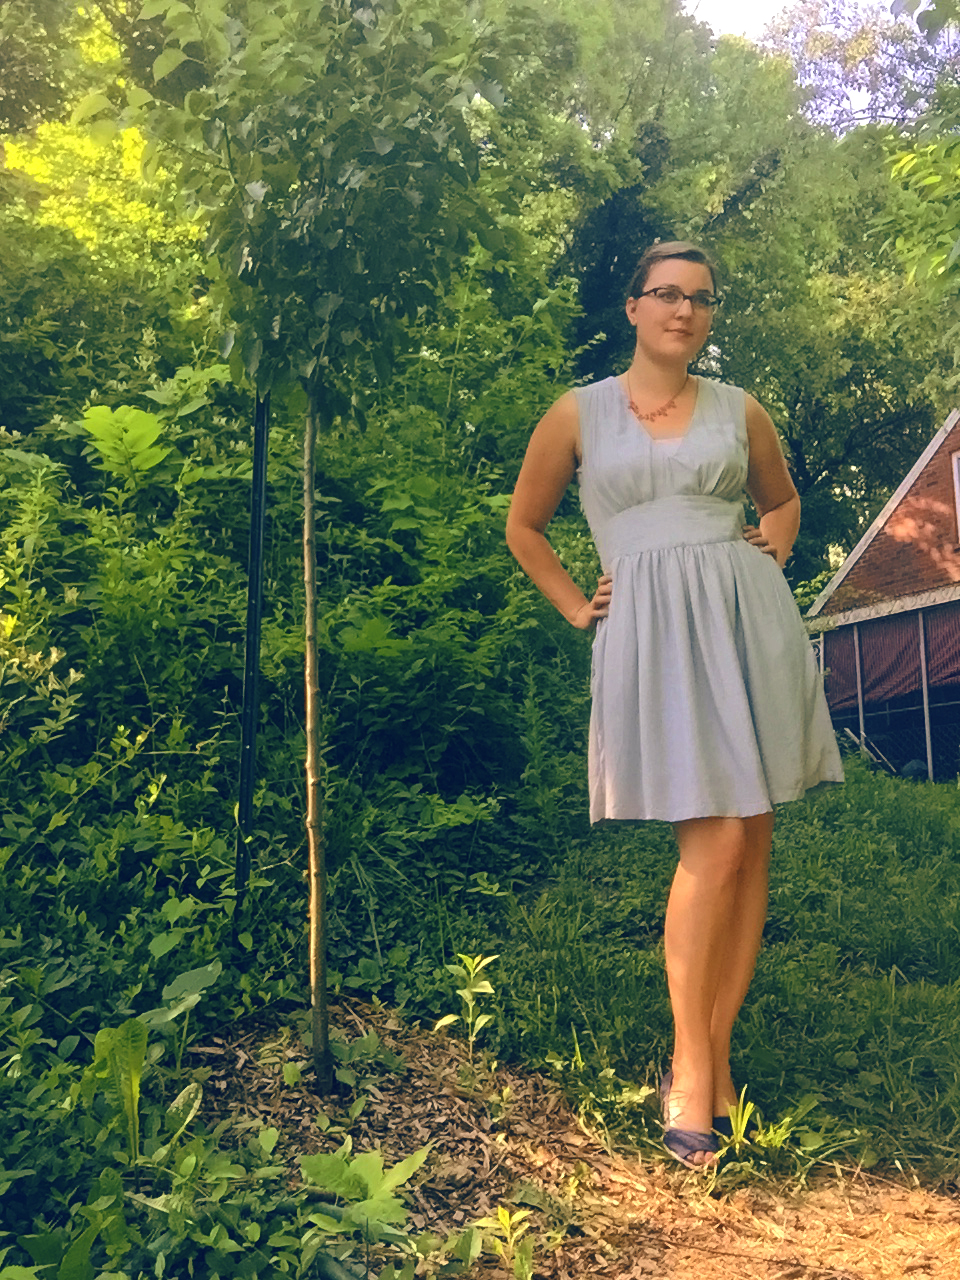 [/responsive]That said, this dress is very wearable and it's super light and flowy. Perfect for summer! Actually, the looser waist is kind of nice, too, so I don't feel like I have to suck it in all the time :)[responsive]
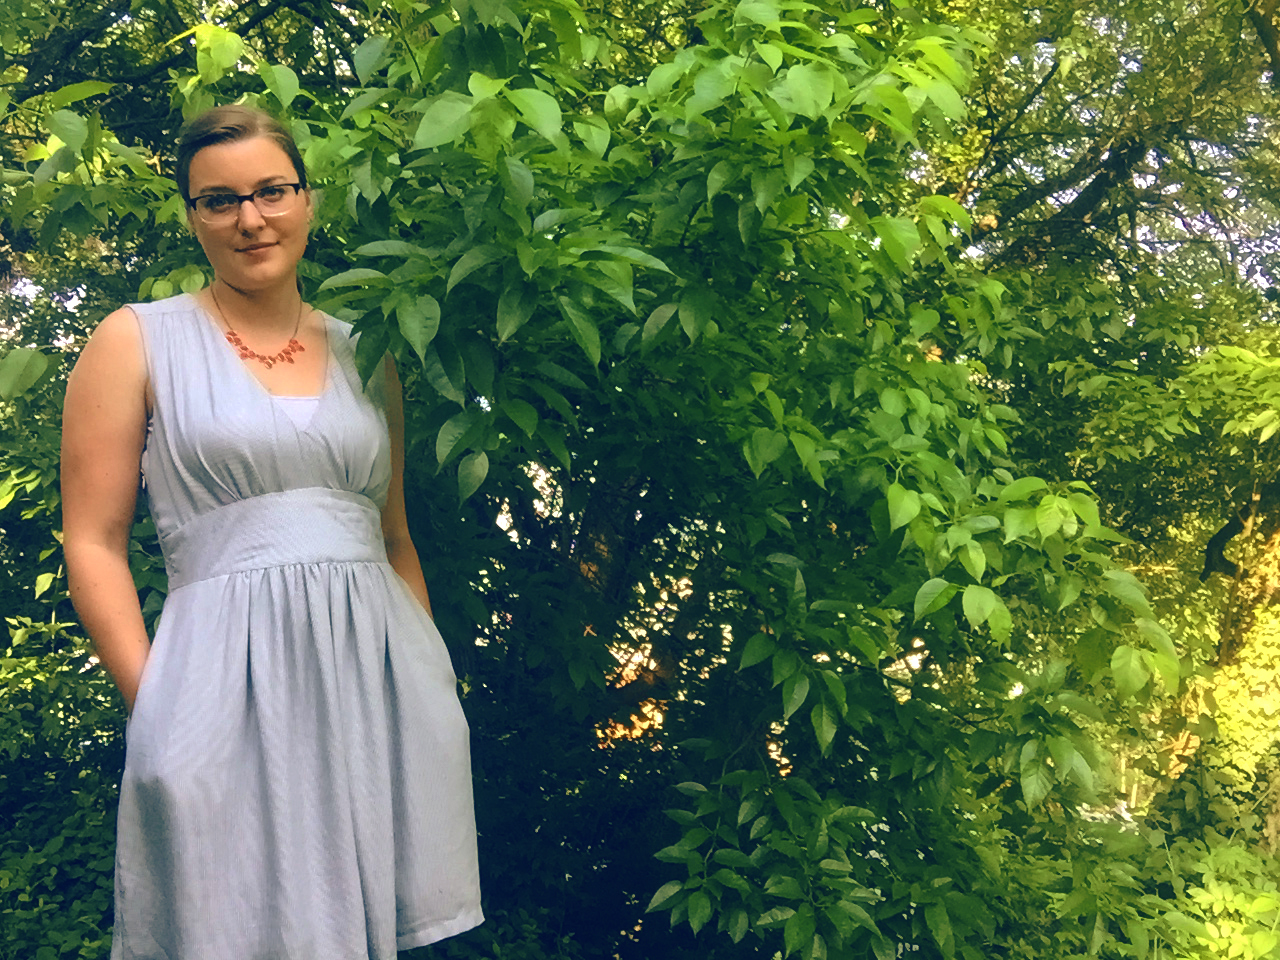 [/responsive]There was nothing too crazy about this pattern except for the side zipper and in-seam pockets. I've done in-seam pockets before but it was a little different when I had to sew a zipper into the side of the pocket. The instructions were clear, though and I didn't have an issue with the pockets. Of course, I put the zipper in on the right side instead of the left. Oops. Just a learning experience for the next time, I guess![responsive]
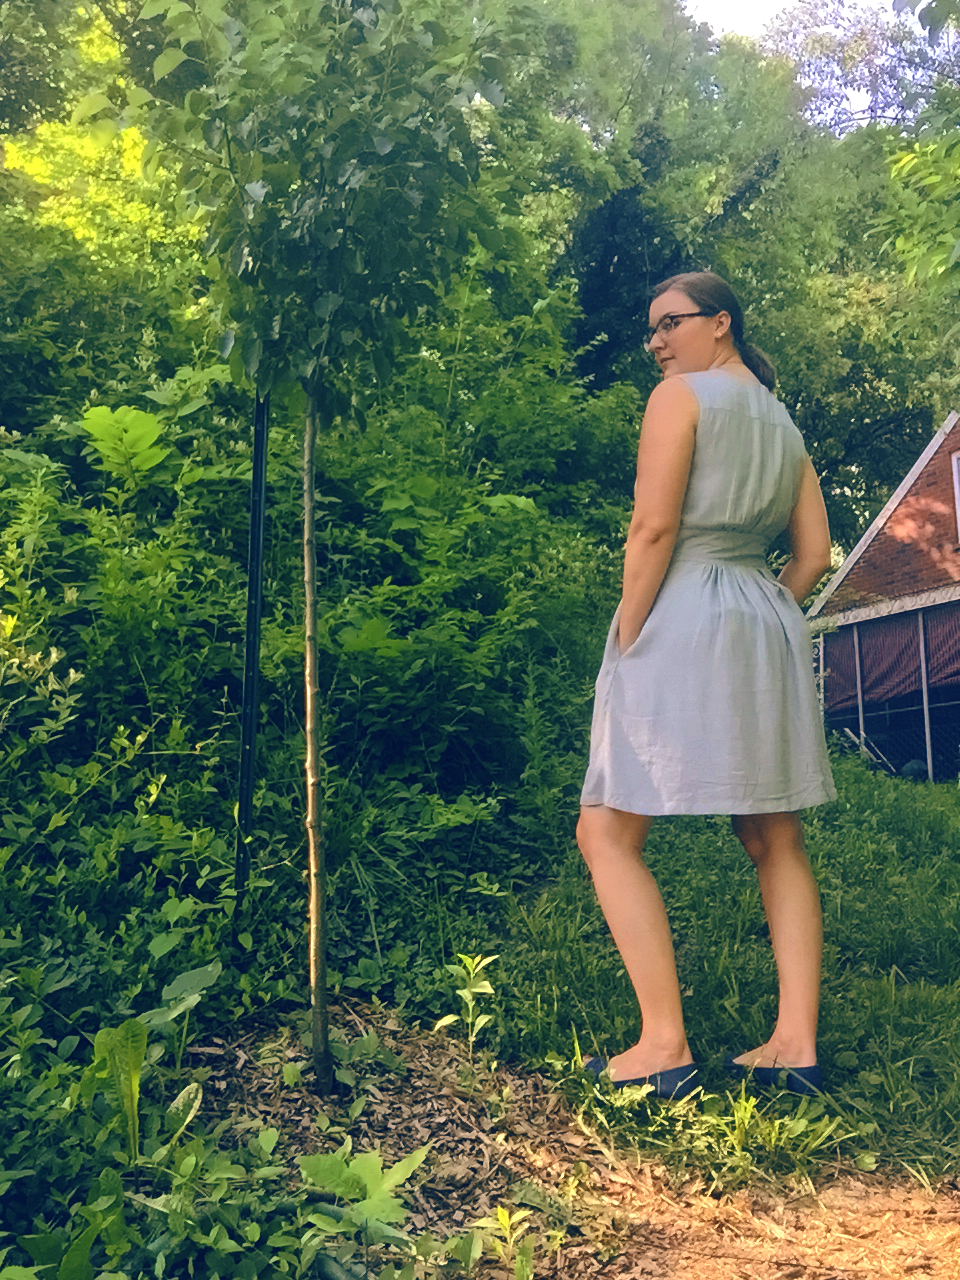 [/responsive] Bonus:I had my phone set up to take a few quick pictures and set the 10 second timer. Didn't realize that it also took 10 photos in a burst, but I thought they look pretty cool as gifs.[responsive]
 [/responsive][responsive]
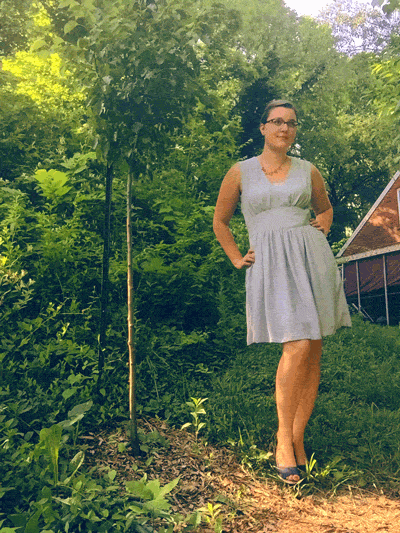 [/responsive]
Home Tour April 2015
After about two and a half years of renovation our house is starting to look pretty nice, if I do say so myself. What started out as a cape cod with cracks around every door and window and walls that hadn't been painted since the 70s is now an abode that is comfortable, contemporary and perfect for us. Brad loves adding little touches that most people would never even think about doing, like an inset spice rack into our custom-built kitchen island, just to make use of every nook and cranny. We still have several projects left to do before Brad starts taking apart old projects and redoing them :)While the house was clean last weekend I was able to take some photos of our progress. To really appreciate how far we've come here is the link to our initial video home tour: http://static1.squarespace.com/static/5cf521a7527bbf0001a3b066/5d0b99f5dd780f0001cbf6f2/5d0b9a19dd780f0001cbf8ea/1561041433813/a?format=original>And here's a link to the photos: https://www.flickr.com/photos/87092290@N07/sets/72157631513010652/
Living Room
[suslider source="media: 732,731,730,729,728" link="image" height="400" title="yes" pages="no" mousewheel="no" autoplay="0"]We haven't done a whole lot to the living room except for "glid walling" (applying thin sheets of fiberglass with plaster to prevent cracks from forming) and painting. Brad installed five can lights along the front wall which really makes a huge difference at night. We've also made new baseboards for this room and Brad redid the molding around the front door.Dining Room
[suslider source="media: 712,711,710,709" link="image" height="400" title="yes" pages="no" mousewheel="no" autoplay="0"]Glid walled and painted, new baseboards. Brad redid the archway from the living room into the dining room.Kitchen
[suslider source="media: 717,716,715,714,713" link="image" height="400" pages="no" mousewheel="no" autoplay="0" speed="0"]This room has probably had the biggest transformation so far. We started by taking down all of the original metal cabinets, sanding, priming and painting them with Rustoleum. Brad polished up the boomerang handles and we reinstalled them on a newly painted/plastered back wall.Brad built the kitchen island from scratch using pieces of what he had in the basement. We wanted a place to house a dishwasher and another cabinet without wasting any space. The resulting island is beautiful, functional and the perfect size. There's even space for a few stools under the overhang of the counter!Bedroom
[suslider source="media: 747,746,745" link="image" height="400" pages="no" mousewheel="no" autoplay="0" speed="0"]Plastered/painted. There's not a lot of closet space in here so we have huge shelves to hold all of our folded clothes (and Brad's rather large shoe collection).Bathroom
[suslider source="media: 720, 719,718" link="image" height="400" pages="no" mousewheel="no" autoplay="0" speed="0"]Plastered/painted. The original tile actually isn't that bad compared to some of the colors you'd find in a house built during this time period. It's also in pretty good shape so we'll keep it for now.Studio (2nd Floor)
[suslider source="media: 727,726,725,724,723,722,721" link="image" height="400" pages="no" mousewheel="no" autoplay="0" speed="0"]Repaired drywall, took down a wall, painted, painted again, installed beadboard around the stairwell, installed a custom light fixture, installed baseboards, added a ton of new outlets, laid down new vinyl flooring and built in the desk area. One of my favorite little touches in this area is the plate glass over the stairwell so I can lay out and cut fabric over it without sacrificing the light.Guest Bedroom
[su_slider source="media: 735,734,733" link="image" height="400" pages="no" mousewheel="no" autoplay="0" speed="0"]Repaired drywall, installed a plywood flooring ceiling (using material from Brad's brother's house), painted, added new outlets, installed baseboards, laid new vinyl flooring and opened a space in the wall for built ins. That's all for now! If you have any questions about a specific project please let me know. (And I'll ask Brad, because he's obviously the brains behind this operation!)Petit Vour March 2015
It's that time, once again...Petit Vour time! It's always so exciting to see that little pink package of goodies in my mailbox. This month they've been teasing Juice Beauty's CC Cream, so I was expecting to receive that product. The other products they included this month are:Vert Mont Perfumery | Eros PerfumeThe Little Alchemist | Cacao & Banana Face GlowMetropolis Soap Co | Spearmint & Lavender Nourishing Lip Cream[responsive]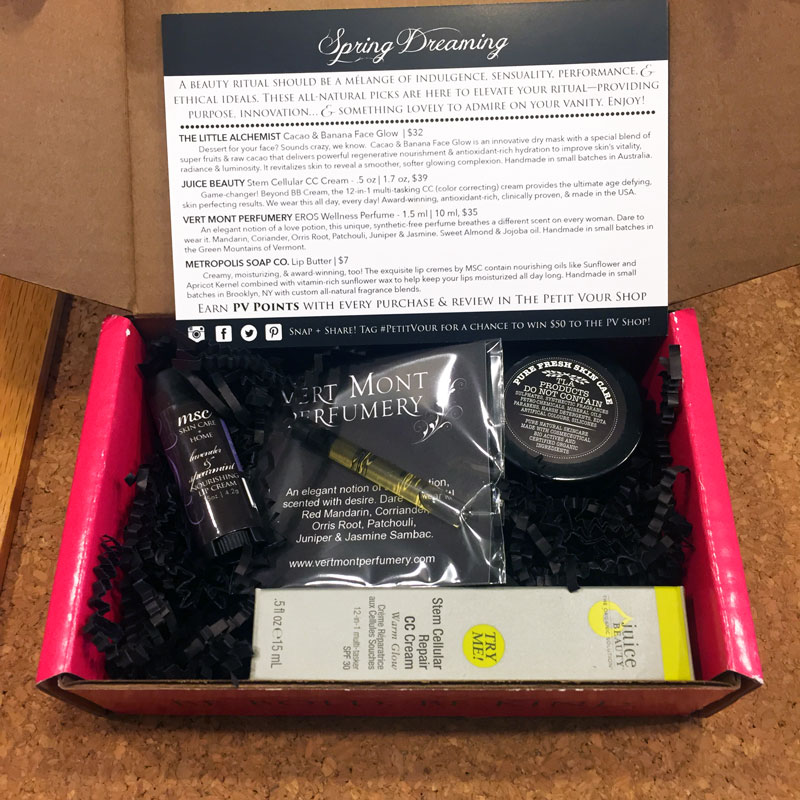 [/responsive][responsive]
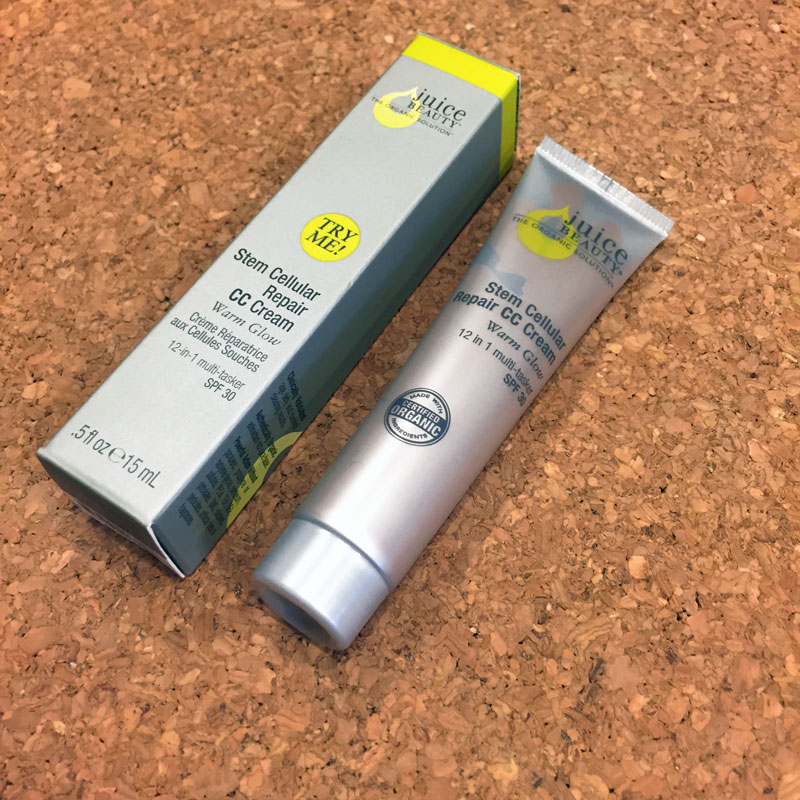 [/responsive]After trying the CC cream twice now, I can say it's got a thicker consistency than my usual Yes to Grapefuit CC cream. It also seems to give a little better coverage and gives my face a natural sun-kissed glow. Unfortunately, I'm not a huge fan of the smell. It dissipates after a few minutes but it just doesn't have a great scent. Overall, good product but probably not different enough from what I normally use to make a switch.[responsive]
 [/responsive]This stuff feels and smells amazing and stays on your lips for quite a while. I typically want a little bit of tint in a lip balm, but this would be great to use right before bed to leave your lips feeling soft and smooth in the morning.[responsive]
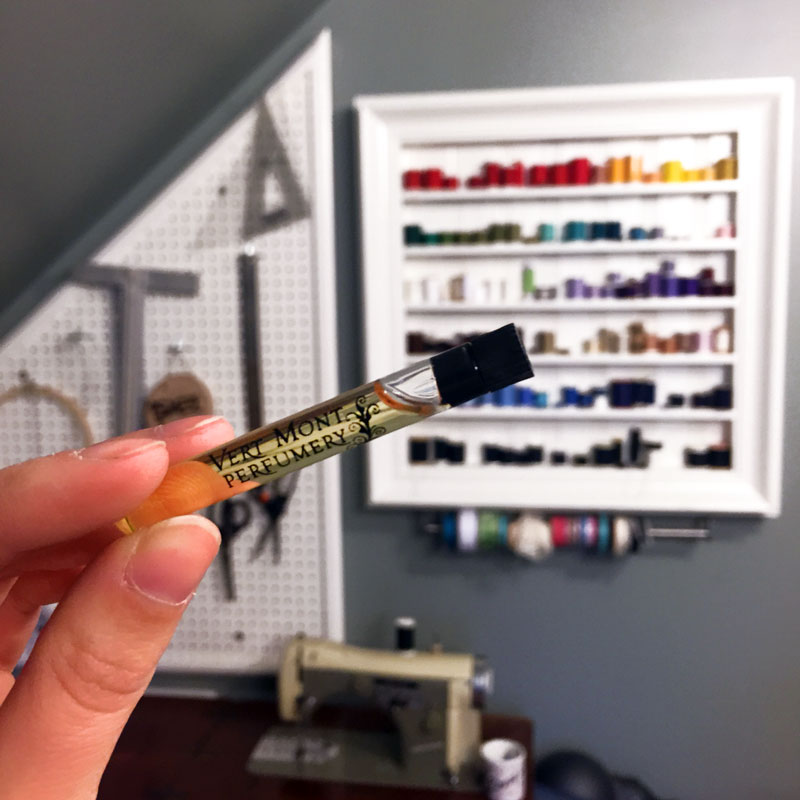 [/responsive]First of all, I hate these tiny perfume bottles. They're a pain to open and a pain to use. Also, PV seems to be sending a lot of perfume lately and I'd prefer more skincare products instead. That being said, the fragrance is really nice. It's earthy, sensual and strong. Sort of reminds me of an oil blend that I have from doTerra...I can't recall the name at the moment.[responsive]
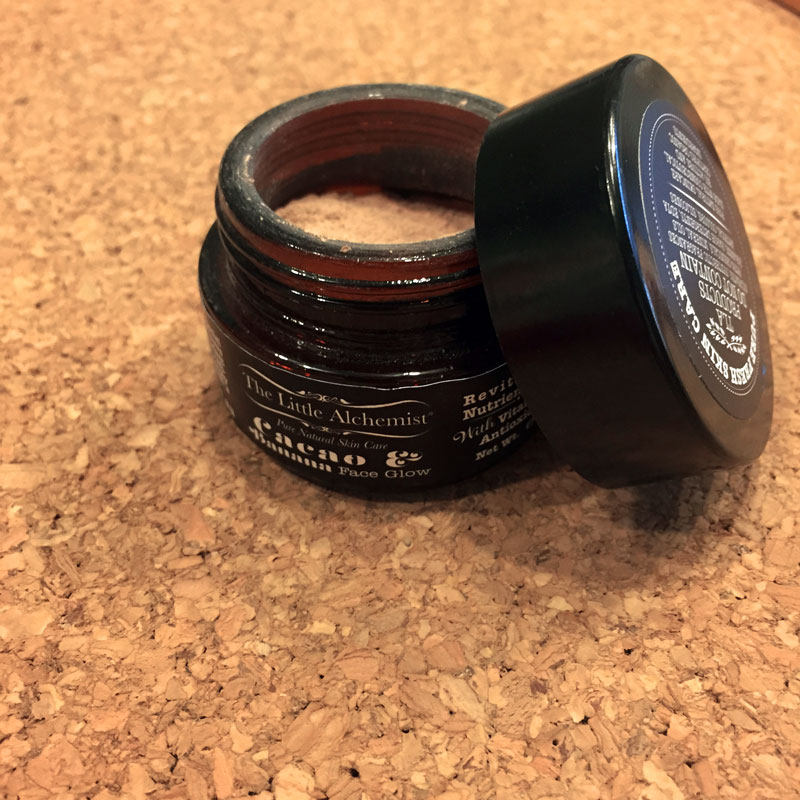 [/responsive]I haven't gotten to try this product yet, but if the scent is any indication it will be fabulous! Like dessert for your face. And the banana notes are actually really subtle.(By the way, in last month's box I got a full size Lily Lolo mascara and I am LOVING it.)In the photo below I am wearing the Juice Beauty CC Cream (PV sample), Everyday Minerals Concealer, Everyday Minerals Blush (PV sample), Everyday Minerals Jojoba Matte Face Powder, Ulta Eyeliner, Lily Lolo Mascara (PV sample) and Pacifica Blood Orange Lip Tint.[responsive]
 [/responsive]